- Home /
Occlusion culling for randomly generated level
I'm generating a maze using a random depth first algorithm when the game is started. This maze consists of blocks placed according to a grid, 1 for a wall block and 0 for an empty space. The size of the maze is around 100x100.
To optimize performances, I'd like to enable occlusion culling for my wall blocks so only the ones the player is looking at are rendered.
However, it seems occlusion baking is only possible within the unity editor or using StaticOcclusionCulling which again, is an editor only class.
How should I do to enable occlusion culling for static objects generated randomly at the start of my game ?
Answer by ajhatch · Feb 02, 2017 at 05:12 PM
The specific technique you're looking to use is referred to as dynamic occlusion culling. There's a few ways to accomplish this in Unity depending on how much time and money you're willing to spend and how you want to accomplish it.
The fastest way is to buy InstantOC on the asset store, or a similar asset (I do not have any relation to this asset or its creator). It's pretty much designed for what you want to do.
You could also manually raycast from your camera and deactivate any objects not raycast to, but that might be performance expensive - it's essentially what's being baked in advance with normal OC. Per this reddit thread, you could also instantiate a spherical collider around your camera and deactivate any objects not within that collider. If you have a general idea of the maximum visible area your maze can generate you can use that to set the size of your collider and that should be a fairly low-overhead solution that doesn't waste much render time.
Answer by Peeling · Feb 11, 2021 at 10:51 AM
In case anyone's still searching and finding this question, I just got done implementing a pretty successful solution. The code is too specific to the way my dungeon is built to usefully share, but the principle is generally applicable.
FOR A SIMPLE BINARY MAZE LIKE THE ONE IN THE QUESTION:
The first and hardest part is to create a data table for use at runtime. There are a lot of different ways to do this, but the simplest is to brute-force it with Unity's raycasting:
In an empty scene, create a Quad. Set the X scale to 2 times your desired vision range in maze blocks (so if you want to be able to see 10 blocks, set the X scale to 20)
Call the quad "Z+"
Position the quad at 0,0,0.5
Duplicate the quad eight more times, and put each one further away (0,0,1.5) (0,0,2.5) etc
Make another quad just the same, but call it "Z-". Put it at (0,0,-0.5)
IMPORTANT: Set the Y angle of rotation to 180 so that the quad 'faces' (0,0,0)
Duplicate this quad eight more times, positioning each one 1 unit further away from the origin (0,0,-1.5) (0,0,-2.5) etc.
When you're done, you should have 18 'fins'.
Repeat the above process, but with quads at 90 and -90 degrees, spaced along the X axis, and called "X+" and "X-"
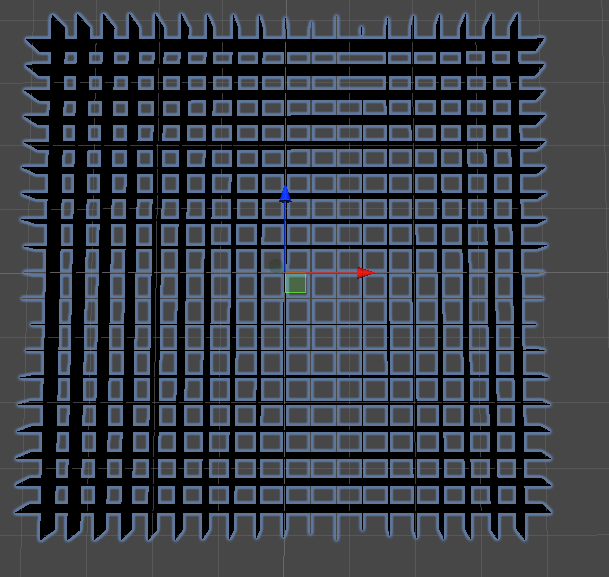
The final result should look something like this, when you view it from directly above:

IMPORTANT! This lattice ISN'T the size of your maze, it's the size of your desired view range. Your maze can be any size you like.
Now you're ready to start raycasting. Create a script called LineOfSightCalc.
Create a SightLineStep class:
 public class SightLineStep
     {
         public Vector2Int tile;
         public List<SightLineStep> onward;
     }
Create a 'root' SightLineStep with a tile of (0,0)
Use a loop (or better yet a coroutine so Unity doesn't lock up) to do the following:
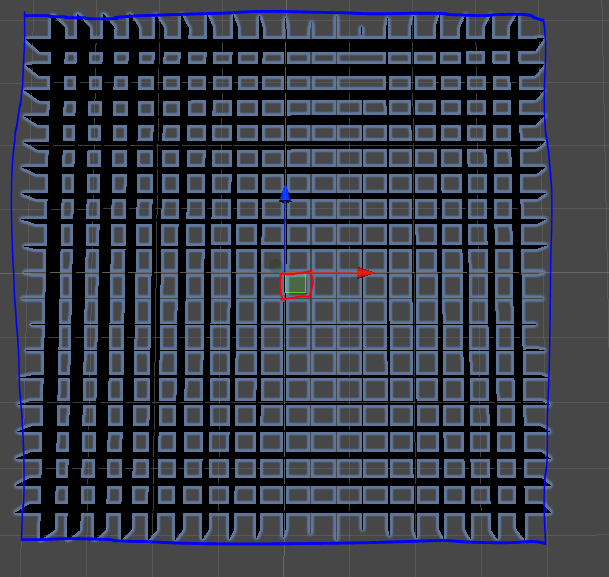
Use Physics.RayCastAll() to cast a ray from every point near the perimeter of the centre squareto every point on the outer perimeter of the whole array of fins. By 'every point' I mean at tight intervals; the tighter the interval the more accurate the results. I'm talking about casting between the red highlighted square and the big blue highlighted square:

Each time you raycast, sort the hits into distance order and start walking through them:
 SightLineStep walk = root;
 Vector2Int pos = Vector2Int.zero;
 foreach (RayCastHit rch in SortedHits)
 {
     switch(rch.collider.name)
     {
         case "X+":
             pos.x += 1;
             break;
         case "X-":
             pos.x -= 1;
             break;
            <etc>
     }
     SightLineStep nextStep = null;
     foreach (SightLineStep sls in walk.onward)
     {
         if (sls.tile == pos)
         {
             nextStep = sls;
             break;
         }
     }
     if (nextStep == null)
     {
         nextStep = new SightLineStep(pos);
         walk.onward.Add(nextStep);
     }
     walk = nextStep;
 }
When all the rays have been cast, 'root' will contain a tree of unique sightlines - every possible sequence of cells you can see through, standing in the centre square. That sounds like it could be a lot, and if you have a large view range it could be, but for a range of 10 you're looking at just a few thousand table entries. Assuming SightLineStep is serialisable, you can drag out a prefab from the running scene and you're good to go.
Now for the fun part!
All you need to do at runtime to cull your maze for rendering is to recursively walk the tree of data, checking each tile of the maze as you go (relative to the player's current position). If you encounter a solid (wall) tile, enable it for rendering and then return without exploring any of the 'onward' branches. Since the tree contains every possible sequence of tiles through which any given tile might be visible, nothing will be missed.
Although the data table will contain several thousand entries, in practice the algorithm will only walk a tiny fraction of them (unless you have a very open maze with rooms bigger than your sight radius). The windier the maze, the more will be culled and the less time the algorithm will spend doing it.
FOR A WALLED MAZE:
This also works for mazes with thin walls separating adjacent tiles. You can either add extra data to the table to identify which boundary should be checked before crossing, or work it out at runtime from the direction taken from 'walk' to 'nextStep'.
Your answer

