Cooldown effect in a button
Hi! I'm having problems searching tutorials or information about that, I read the famous post of Eric5h5 link text but not exactly what I want to do. My idea is something like this
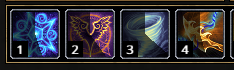
I'm a bit lost, some help would be awesome!
Thanks in advance ;)
Yeah you need a transparent cutout shader that actual renders something transparent when not cutting out to use Eric's method in this case. I don't have the time right now to write that shader for you - but it is something that isn't too hard if you follow one of the shader tutorials.
A "quick and dirty" method would be to draw "n" sprites and render the correct one (16 perhaps) or use NGUI which has a circular fill method on its widgets.
Seen this tutorial link text I get do that 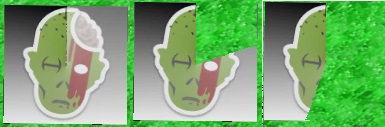 attaching the image to a cube, and controlling from "Alpha Cutoff", but I dont know how do this in a gui.button and how control it from script.
If someone could help me, I'd really appreciate :)
cheers bud this is exactly what i was looking for, and it slipped my $$anonymous$$d xD
EDIT: This method is obsolete! See the answer below for the updated solution.
This is probably not the most efficient method, but I (probably like many) have no idea about making shader code.
So a short description of how this works/what it does to help those trying to understand what's happening:
Firstly the texture set to the variable 'tex' has to be set to read/writable. To do that you need to select the texture -> set 'Texture Type' to advanced and tick the 'Read/Write Enabled' tick box. I would suggest also changing 'Format' to 'ARGB 32' else you may get some warnings in the console.
As this is not a particularly efficient process I have put it in its own function which is only called from update if the variable 'progress' has changed, this avoids unnecessary getting and setting of pixels. I would suggest you eventually try to avoid calling it as much as possibly and possibly put have it as an invoke repeat which is started when an ability is used and is cancelled when the progress reaches 1.
Also to boost efficiency, as the pixels of the textures are iterated through, make sure your textures are the smallest pixel size possible to begin with as a 16x16 texture needs to make 256 calculations compared to a 64x64 which would need 4096 calculations for the same function call (this will also save file memory)
I would suggest that for ever instance of the progress button you use 2 textures as I have done rather than 1 as this will avoid you overwriting the original texture data.
Code
 var tex : Texture2D;
 var color : Color;
 var progress : float = 0.0;
 private var oldProg : float = 0.0;
 private var progTex : Texture2D;

 function ProgressUpdate(progress : float, overlayColor : Color){
     var thisTex = new Texture2D(tex.width, tex.height);
     var centre = Vector2(Mathf.Ceil(thisTex.width/2), Mathf.Ceil(thisTex.height/2)); //find the centre pixel
     for(var y : int = 0; y < thisTex.height; y++){
         for(var x : int = 0; x < thisTex.width; x++){
             var angle = Mathf.Atan2(x-centre.x, y-centre.y)*Mathf.Rad2Deg; //find the angle between the centre and this pixel (between -180 and 180)
             if(angle < 0){
                 angle += 360; //change angles to go from 0 to 360
             }
             var pixColor = tex.GetPixel(x, y);
             if(angle <= progress*360.0){ //if the angle is less than the progress angle blend the overlay colour
                 pixColor = Color(
                     (pixColor.r*pixColor.a*(1-overlayColor.a))+(overlayColor.r*overlayColor.a),
                     (pixColor.g*pixColor.a*(1-overlayColor.a))+(overlayColor.g*overlayColor.a),
                     (pixColor.b*pixColor.a*(1-overlayColor.a))+(overlayColor.b*overlayColor.a)
                                 );
                 thisTex.SetPixel(x, y, pixColor);
             }else{
                 thisTex.SetPixel(x, y, pixColor);
             }
         }
     }
     thisTex.Apply(); //apply the cahnges we made to the texture
     return thisTex;
 }

 function Start(){
     progTex = ProgressUpdate(progress, color);
 }

 function Update(){
     if(oldProg != progress){
         progTex = ProgressUpdate(progress, color);
         oldProg = progress;
     }
 }

 function OnGUI(){
     var guiStyle : GUIStyle = new GUIStyle("button");
     guiStyle.padding = RectOffset(0, 0, 0, 0);
     GUI.Button(Rect(10, 10, 32, 32), progTex, guiStyle);
 }
Hopefully this helps answer your problem,
Scribe
P.S.
emember to give credit for the graphics used if they are not yours, I realise this might have just been an example and not from your own game, but in-case anyone is looking for the graphics they are by J. W. Bjerk
Thanks for your answer and your time Scribe!! Good job man! Works awesome Is possible to do this with 2 images (one darker) to try imitate the first image effect? Or other way to do more beautiful? Congrats for your job.
on line 17 of my code, changing angle <= progress*360.0 to angle >= progress*360.0 should mean the rotation goes the otherway. Then when you choose a colour set the alpha to be ~0.5 and it should have a similar effect to the first image you posted! Once you've got it working remember to mark your question as answered, so others know where to look!
Oh thats it!! I got what I want now, its perfect! Thank you so much! :D
Sorry for disturb you again, one last thing. I've done this: 
When I click, it do the effect. Im trying to do now: -if button cost 20 gold and I have more I want it shows without this shadow like this:

else, if I have less than 20 like first pic. I tried with your code, but I cant get it :/
I know this is old but google leads here :)
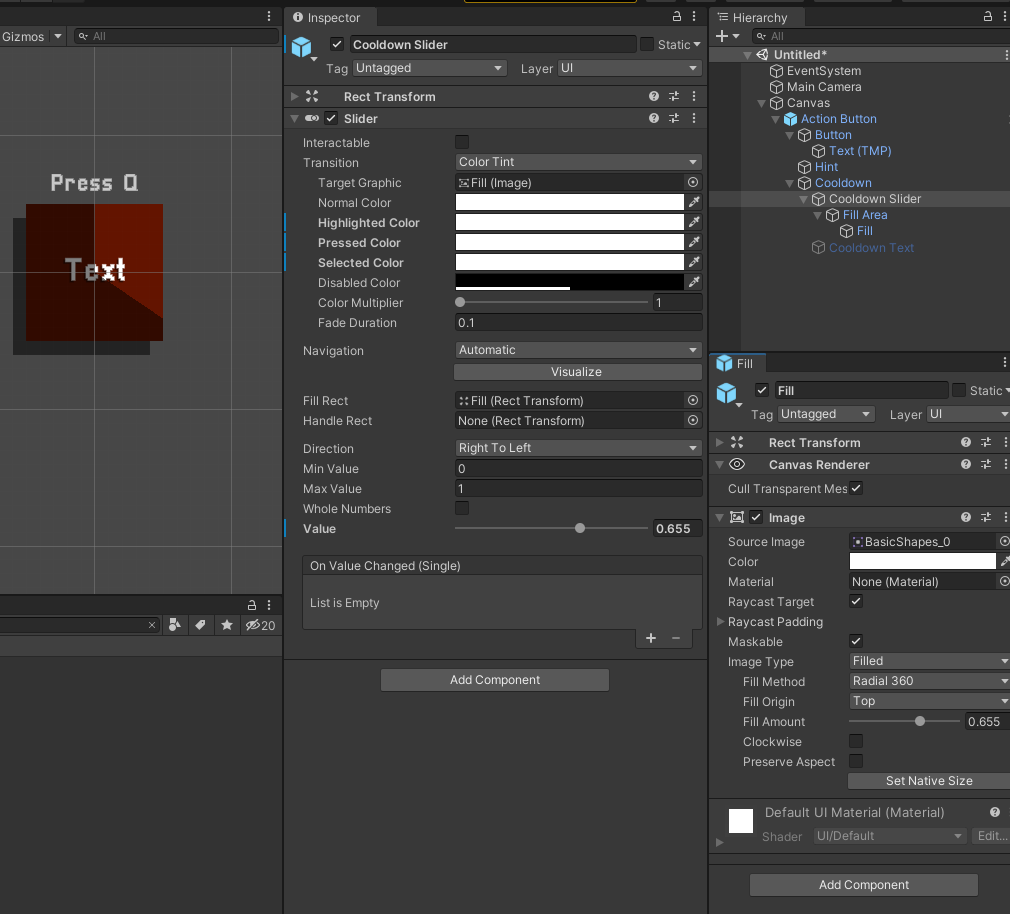
With a new UI in Unity 4.6 which is available in beta (for the time of writing) you can do this much, much easier.
Create Image as a child for an icon, stretch it so it covers your icon.
Add sprite with alpha.
Set image type to filled.
Set fill method to Radial 360.
Play with fill origin, fill amount and clockwise.
If you change fill method, then you can differend cooldown types (vertical, horizontal etc.).
I hope I saved someone's time :)
This is a shabby but working way:
 float timer;
 bool firstTimePressed;

 //set Cooldown Time in seconds here
 public float cooldownTime;

 void Start()
 {
 firstTimePressed = true;
 }

 void Update()
 {
 timer += Time.DeltaTime;
 }

 public void OnButtonPress()
 {
 if (firstTimePressed = true)
 {
  WhatButtonWillDo ();
 firstTimePressed = false;
 timer = 0;
 }
 if (firstTimePressed = false && timer >= cooldownTime)
 {
 WhatButtonWillDo ();
 timer = 0;
 }
 }

 void WhatButtonWillDo ()
 {
 // Enter button function here
 }
This post was the first to show up on google, so for the sake of completeness:
The easiest way to accomplish a cooldown effect is by combining the image settings from antosdaniel's post with a slider, like this.
You can then use the normal slider controls (maxValue, value) and the fill image will automatically fill in a circular shape.
