[SOLVED] Combining 2 textures into one
Hi, I'll make this simple. What I want to achieve is putting a transparent texture on top of a non-transparent one which will serve as it's background. Kinda like watermark. These textures are placed on cubes.
Currently I think that the problem is that this lane
o.Albedo = backgroundTex+decalTex can't deal with transparency and causes the problem below.
First of all I'd like to note that I have very little experience with shaders, so I would be really glad if someone could help me with this. (I feel like it shouldn't be hard). The thing I want is easy. I want to combine 2 textures in a way shown below.
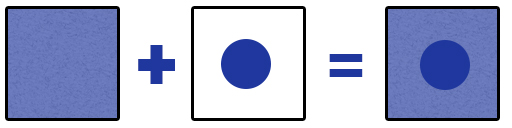
o.Albedo = backgroundTex+decalTex
Since the sample image with the dot just shows white background: With this formula, you want the background around the dot to be BLAC$$anonymous$$ (RGB= 0,0,0) or transparent (RGBA=0,0,0,0)- which could just be showing up HERE as white. Is that the case?
Also, any idea the result show a PLUS rather than a dot? You only mentioned color as an issue.
Blue Tinted: not sure what you mean here...you WANT the area under the blue dot to be blue tinted, right? And the first image in your sample starts out blueish, so why wouldn't you expect the result to be also? Or are those white pixels, that are NOT under the dot, also turning blue?
Simply. I want to put one (semi-)transparent image on top of another non-transparent image which is used as background. Sorry for the confusion. The border around every single image is supposed to show the size of the actual image. The blue tinting was meant as description of problems with my solution. The 2nd image (with that one box) is what I have been able to achieve. The problem in what I currently have is that the transparent spots are probably filled with nearby pixels. You can spot whats wrong easily if you compare it with the final image from my formula.
well, the adding of the two Tex colors seems like the correct way to combine them to me. Perhaps the problem lies elsewhere in your shader? The resultant image makes it look like it's messing up the coordinates of the dot texture, somehow.
It's messing up with coordinates on spots, where it is supposed to be transparent. This could be the only problem with what I have now actually.
There are quite few "tags" used in all those shaders, one of which says if it should use the transparent queue. Perhaps something like that is messing it up? $$anonymous$$gest you post your whole shader script. (PS: just got into shaders myself, not long ago- this page was invaluable as it has so many samples: http://wiki.unity3d.com/index.php/Shaders I couldn't find one that does exactly what you are looking for tho.)
We were wrong about just adding the two colors: that would only work with black, rather than transparent.
I modified yours alot to make it clearer what changes I made. Also, that last line where I set o.Aplpha... options- might want to set it to 1.0, or the greater of the two texture alphas, or the multiplied product of the two alphas. EDIT: OP wanted an opaque final texture, and so removed the "alpha" from the #pragma surface line.
 Shader "Custom/OreShader" {
      Properties {
          _Color ("Color", Color) = (1,1,1,1)
          _MainTex ("Main Texture Color (RGB)", 2D) = "white" {}
          _SecondaryTex ("Overlay Texture Color (RGB) Alpha (A)", 2D) = "white" {}
          _Glossiness ("Smoothness", Range(0,1)) = 0.5
          _Metallic ("Metallic", Range(0,1)) = 0.0
      }
      SubShader {
          Tags { "RenderType"="Transparent"}

          LOD 200
          CGPROGRAM
          // Physically based Standard lighting model, and enable shadows on all light types
          #pragma surface surf Standard alpha fullforwardshadows

          // Use shader model 3.0 target, to get nicer looking lighting
          #pragma target 3.0

          sampler2D _MainTex;
          sampler2D _SecondaryTex;

          struct Input {
              float2 uv_MainTex;
              //float2 uv_SecondTex;
          };

          half _Glossiness;
          half _Metallic;
          fixed4 _Color;

          void surf (Input IN, inout SurfaceOutputStandard o) {
              // Albedo comes from a texture tinted by colora
              float4 mainTex = tex2D (_MainTex, IN.uv_MainTex);
              float4 overlayTex = tex2D (_SecondaryTex, IN.uv_MainTex);
         half3 mainTexVisible = mainTex.rgb * (1-overlayTex.a);
         half3 overlayTexVisible = overlayTex.rgb * (overlayTex.a);

         float3 finalColor = (mainTexVisible + overlayTexVisible) * _Color;

              o.Albedo = finalColor.rgb;
              // Metallic and smoothness come from slider variables
              o.Metallic = _Metallic;
              o.Smoothness = _Glossiness;
              o.Alpha = 0.5 * ( mainTex.a + overlayTex.a );
          }
          ENDCG
      }
      FallBack "Diffuse"
  }
You want to set the Non-Transparant texture on a separate layer. For example, You put the Transparant texture on layer (-1) and the Non-Transparant on layer (0).
Set the Images you import to > Sprite Image.
Use photoshop to make your image transparant by lowering down the opacity. And maybe for example erasing a colour by selecting an Alpha colour and deleting it.
They're rendered with $$anonymous$$esh Renderer, not Sprite Renderer to give the object some depth. However I import them as sprites, because I used them in several places and it shouldn't be causing those problems. I think the problem is that "o.Albedo = backgroundTex+decalTex" can't deal with transparent parts.
