Project a video Texture using Unity5's Projector
Hi,
As the title says my goal is to use a projector in order to project a Video onto a plane or wichever 3d object. I currently achieved this behavior BUT for an image, not a video, so i have a projector projecting an image in my scene, applying it to all the 3D object who cross the projector's radius if i can call it like that.
I'am assuming that i need to find a way to transform my video into a texture in order to be able to project it the same way as i do with the image.
Surprisingly i tought it would be much easier, i've been searching for tutorials etc since the begining of the week now and it doesn't seems like somebody had the same problem/posted something equivalent somewhere on the internet.
I'am probably missing something i guess, or it's clearly not that easy, anyways all hints/guidelines are welcome :) !
Hallelujah, despite searching for days i've found a solution ! Remember, the goal is to project a video using Unity's projectors, here are the steps in order to achieve it:
- 1: Create a Camera
- 2: Create a RenderTexture an make sure the Wrap mode property is set to clamp (On my screen the RenderTexture name is "SpoutRenderingTexture" but the use of Spout is purely specific to my project and this is just a custom name i gave to my RenderTexture to find it easily)
- 3: Add a VideoPlayer Component to your cam
- 4: Set the VideoPlayer's video clip property to your video (In my case "Tom Clancy's Something..."
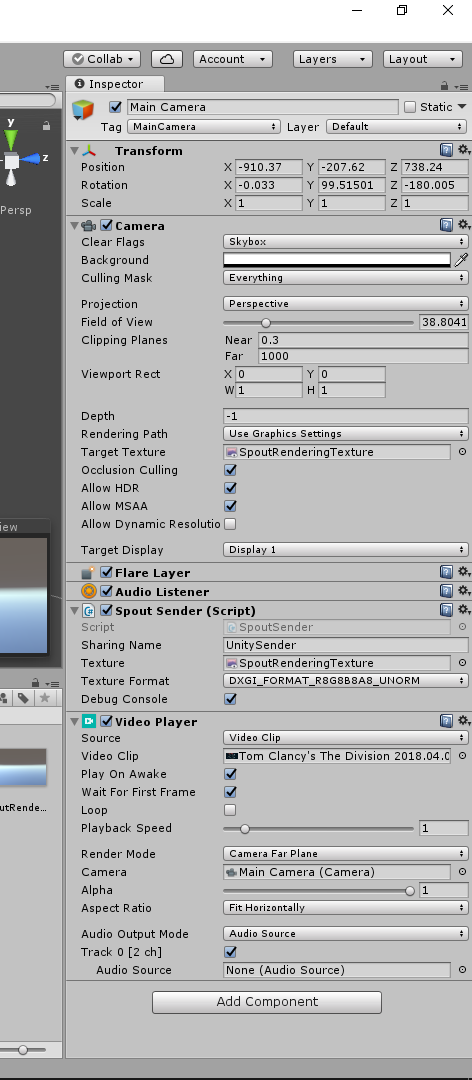
- 5: Make sure the VideoPlayer's RenderMode property is set to Far Plane, and the Camera property set to your Camera (step 1)
- 6: Set your Camera's Target Texture property to your newly created RenderTexture
- 7: Make sure your camera is facing absolutely nothing, no objetcs crossing the view etc (could be done by using layers to separate the camera and your scene)
Camera Inspector view:
  - 8: Create an Empty GameObject with a projector component

  - 9: Create a new Material

  - 10: Set your projector's Material property to your newly created Material

  - 11: Go back to the Material you previously created (step 9) and change it's shader to a Projector -> Multiply (else the projection won't work)

  - 11.5: You may need to import Unity projector's package, it's very simple and there is plenty of tutorials so i won't cover it here, but it's extremly straightforward.

  - 12: Your Material will now have 2 texture slots, drag and drop your RenderTexture (step 2) to the cookie slot (the one on  top)

  - 13: Place wichever object you want in your projector's Field Of View and run, you should see your video applying to them ! You can now play with the size, FOV, etc of your objects to make  the projection looks like what you desire !
If you need Help, be free to comment under this post ! Hope it will help some of you as there are no online tutorials for this (at least none i could find by spending 2 weeks searching) :) !
Overall Downsides:
Basically the same as an image projection: the last pixels on each borders of your video will repeat themselves infinitly, there is a solution for that implying shader modification to add a Black border around your video at runtime, or doing this yourself using a Video Editing Software
Can be a source of high cpu usage if there is too many projections at the same time i guess ?
Nice solution, thanks for sharing!
If you want your camera to not render anything else, then use its Culling $$anonymous$$ask property. In this case it may be enough to set it to nothing, but maybe you will need to set it to the layer of the game object on which the VideoPlayer is. Creating a new layer is a good way to only render by this camera.
God, read about layers a while ago during my searchs, that's actually better than what i do but i did not tought about it! I'am adding it as a secondary solution, thanks ! :)
Thank you for this post! Very informative!
I was able to achieve the same process rendering the video player directly to a Video Texture. Is there a reason to have the video player render to the camera first?
Hi ! This was posted month ago, i should have came up later to answer you, after i could verify why i did this, but for the moment the project is closed and i don't have access to the source files !
To answer your question anyway, i believe it was a work around at the time, i remember struggling with the video texture and so i thought about just applying the video to a camera and then catching it's ouput on a video texture. I don't know if i wasn't able to apply my video to a videotexture because of an older version or even maybe it was due to the fact that i was using the "free" edtion, god only knows, maybe i'am even dumb and just wasn't able to make that work with video textures even tho it should have been easy in the first place.
Anyway i'am happy you found that interesting :) !
