How To Use new Post Process Layer/Volume in 2018.1 ?
I am trying to use the new Post-Processing Stack in Unity 2018.1, but the effects do NOT show in the Editor, nor do they show in the Game preview or in a Build. All of this worked fine on the same hardware in version 2017.2 using a "Post-Processing Behavior".
The Unity 2018.1 documentation has NOT been updated to reflect the new "Post Process Volume" and "Post Process Layer" (still identical to the 2017.2 doco). So, I was wondering if anyone could tell me what I'm doing wrong.
Here are the steps I am doing:
Under version 2018.1, there is no "Post Processing Behaviour" script. Now there is a "Post Process Volume" and a "Post Process Layer" -- and neither of them seems to work.
Under version 2018.1, I have done the following, but the post-processing effects are NOT working:
I have created a new Post-Processing Profile (Project -> Create -> Post-Processing Profile)
I have added the effects I wanted (this is a NEW step that was not required in the previous versions). In my case, I added "Ambient Occlusion", "Bloom", "Color Grading", and "Depth of Field"
I turned each of these effects ON (this is a NEW step)
I turned ON all of the parameters for each of these effects (this is a NEW step)
I opened the PLAYER settings, and set the color space to LINEAR (default is Gamma) - this seems to be required now for Color Grading (this is a NEW step)
I waited forever while Unity re-imported EVERYTHING (this is a NEW step)
I adjusted one of the parameters in one of the effects that I knew would be easy to see. In this case, I adjusted the "Saturation" in Color Grading to 100%. In previous versions, this is very easy to see when this effect is working and when it is not.
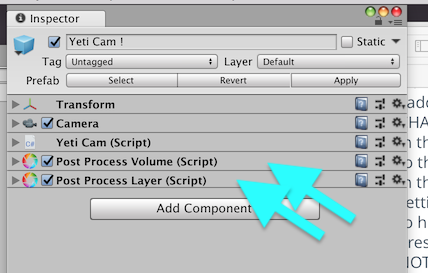
I added a "Post Process Volume" script to the Main Camera (this is a CHANGED step, we used to add a "Post Processing Behaviour")
In the "Profile" parameter of the "Post Process Volume" script, I set this to the Post-Processing Profile that I created in Step 1 above.
In the "Post Process Volume" script (attached t the Main Camera), I tried setting the "Is Global" parameter to both On or Off, but neither seemed to have any effect.
Pressed Play. Looking at the Game tab, I can see that the effects are NOT being applied. I tried dozens of different changes to different effect parameters, but none of them are working.
The Post-Processing Behavior/Profile system worked before in 2017.2.
End-Result: Post-Processing seems broken under the 2018.1 version.
There are 8 things to be done:
* In Unity, open the "Package Manager" and install "Post-processing."
* Install some free camera effects from the asset store ( EXAMPLE )
* actually on the camera in question, add BOTH PostProcessVolume and PostProcessLayer
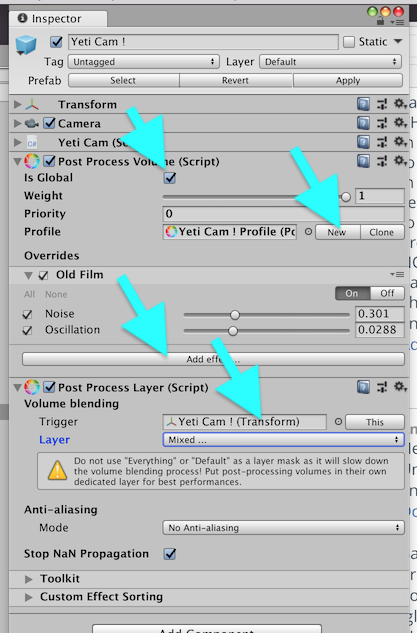
* check the pointless "isGlobal" box
* click, once, the almost-pointless 'New' profile button
* click "Add Effect" and choose one
* set the pointless 'Trigger' simply to the transform of this camera game object
* 'Layer' is pointlessly empty, click it and select 'Everything'
The settings "isGlobal" and "Layer" are not pointless.
If you want to have areas where different post-processing effects apply, you need to uncheck "isGlobal", and put the PostProcessVolume script onto the objects that represent the areas.
Then the PostProcessLayer script will select the PostProcessVolume to apply checking if the "Trigger" (which is usually the camera, so that is a bit pointless) is within the volume of a PostProcessVolume with the specified "Layer". The "Layer" is used to speed up this check, because if you put all your PostProcessVolumes on a special layer, you only have to check a few objects. If you use Everything, it will check against every object on every layer, which is not so good.
Thanks Fattie, and Harinezumi. Very useful combo of information which really helped now and better prepared me for the future. I followed the above, then modified it to the below and ZA$$anonymous$$ - glowwy egg sacks.
@Harinezumi : "Trigger" property is not pointless. It defines which transform unity should use to check whether it has entered the post-processing volume (a cave for example) or not. $$anonymous$$ost of the time, the trigger should be the camera. Say your have FPS-style game in which the camera is placed on the character's head). In this example, when the character enters a cave, Unity checks whether the 'Trigger' transform has any collision with the cave post-processing volume. If yes, it starts post-processing effects.
Now consider a different scenario. You have a top-down game in which you control a character. In this case, camera is very high in the sky. So you should put your character's transform in the 'Trigger' slot (not the camera transform). It means if your character (not your camera) enters the cave 'volume' , your post-processing should take effect.
Yes, it's not pointless, just very often it's the camera. Thank you for giving a a very good example when the trigger is not the camera! :)
If your post-processing volume is global, you can leave the "Trigger" property of the post-processing layer to None. In this way, only the global volumes take effect. However, the safe thing to do is to set it to your camera transform (so in future, if you add local post-processing volumes, they will take effect and won't be ignored by your post-processing layer component).
Hey!
Unity documentation is lagging behind, but you can find documentation and setup tutorial on the PostProcessingStack github page. Documentation wiki. Quick start guide.
Basically, you need to set up a PostProcessLayer to "receive" the post-process effects provided by a PostProcessVolume. The PostProcessVolume tells you the area in which the effects should apply (global means everywhere), and the PostProcessLayer tells what game object it refers to (usually this would be your primary camera).
