Standard Shader Emission control via Script
Hello, I wanted to try out Unity5 Standard Shader feature to re-create one of my custom shaders.
It is basically an emitting shader with an alpha parameter to control the amount of emission at runtime.
Is it possible to control the emission of the standard shader at runtime?
Yes meat5000, the only problem was the fact I did not know the "parameter name" of the emission.
Also read this if you're setting values on a material using the Standard Shader:
http://docs.unity3d.com/$$anonymous$$anual/$$anonymous$$aterialsAccessingViaScript.html
Important info.
Hi Luca,
I was finally able to get this to work after about an hour and a half of research.
Here is my code:
 void Update () {
         Renderer renderer = GetComponent<Renderer> ();
         Material mat = renderer.material;

         float emission = Mathf.PingPong (Time.time, 1.0f);
         Color baseColor = Color.yellow; //Replace this with whatever you want for your base color at emission level '1'

         Color finalColor = baseColor * Mathf.LinearToGammaSpace (emission);

         mat.SetColor ("_EmissionColor", finalColor);
     }
This should be all you need.
If you want to oscillate between something other than 0 and your ceiling (1.0 in this case) just declare emission as such:
 float floor = 0.3f;
 float ceiling = 1.0f;
 float emission = floor + Mathf.PingPong (Time.time, ceiling - floor);
If you want to slow down or speed up the oscillation, just multiply Time.time by a constant. Multiplying Time.time by a constant greater than 1 will speed up the oscillation. Multiplying Time.time by a constant less than 1 will slow down the oscillation.
Best of luck in your development! Make good things!
I'll try it... Where did you found the "_EmissionColor" name?
Someone else's forum post in my research led me to try to find the standard shader source. I couldn't find it in the standard resources that come with Unity but I eventually found it in the download archive
https://unity3d.com/get-unity/download/archive
In the Unity5 shader source materials you can find the actual names that you need to reference by searching for <<"_>> to give you all strings starting with a double-quote and an underscore. I knew I wanted a name beginning with an underscore because of other posts I'd seen about the subject, but just didn't know which one. This one finally prevailed!
To find the Properties of any Shader I recommend you put the following script temporarily into the object that has the shader attached:
 using UnityEngine;
 using System;
 using UnityEditor;
 using System.Collections.Generic;

 [ExecuteInEdit$$anonymous$$ode]
 public class CheckShader: $$anonymous$$onoBehaviour
 {
     void OnEnable ()
     {
         Shader s = GetComponent<$$anonymous$$eshRenderer>().shared$$anonymous$$aterial.shader;
         List<String> props = new List<String>();
         for ( int i = 0; i < ShaderUtil.GetPropertyCount( s ); ++i )
             props.Add( ShaderUtil.GetPropertyName( s, i ) );
         Debug.Log( String.Join("\n", props.ToArray()) );
     }
 }
And have a look at the console after re-enabling the object.
Not to di$$anonymous$$ish your hard work, but all this data is available right in the editor if you switch Inspector to debug mode. Implementing a script for it is entirely unnecessary (and will add useless overhead to your build.)
@dangerdex Would you by any chance know about how to get the emissive state to switch to off or on with no levels of dim$$anonymous$$g inbetween? I've tried the above method and while adding it to a button/switch does toggle it, the emission doesn't turn off completely until about the third button press.
I understand there is another method as well - material swap but haven't got this to work correctly. Ultimately I'm trying to set emissive toggle for VR, I have physical switches/transforms that act as the trigger.
Worked nicely! Thank you! $$anonymous$$y version didn't actually need to use a Renderer Component but requires dragging the gameobject $$anonymous$$aterial to a public field. I also have a speed and maxdistance variables to have extra control in the pulsate effect. This also just uses the color specified in the material Inspector. Here is a snippet of the function.
 public $$anonymous$$aterial lightBulbOn$$anonymous$$aterial;

 void StartPulsating (float $$anonymous$$Intensity, float maxIntensity, float pulsateSpeed, float pulsate$$anonymous$$axDistance)
      float emission = $$anonymous$$athf.Lerp ($$anonymous$$Intensity, maxIntensity, $$anonymous$$athf.PingPong (Time.time * pulsateSpeed, pulsate$$anonymous$$axDistance));
      Color baseColor = lightBulbOn$$anonymous$$aterial.color;
      Color finalColor = baseColor * $$anonymous$$athf.LinearToGammaSpace (emission);
      lightBulbOn$$anonymous$$aterial.SetColor ("_EmissionColor", finalColor);
 }
Standard Shader Properties Here for anyone interested
 _Color
 _MainTex
 _Cutoff
 _Glossiness
 _Metallic
 _MetallicGlossMap
 _BumpScale
 _BumpMap
 _Parallax
 _ParallaxMap
 _OcclusionStrength
 _OcclusionMap
 _EmissionColor
 _EmissionMap
 _DetailMask
 _DetailAlbedoMap
 _DetailNormalMapScale
 _DetailNormalMap
 _UVSec
 _EmissionScaleUI
 _EmissionColorUI
 _Mode
 _SrcBlend
 _DstBlend
 _ZWrite
Hello,
Thanks for listing the properties, that was most helpful.
I recently tried something like this:
mr.materials[1].SetFloat("_EmissionScaleUI", 5f);
While the value changed in the UI, the emission value does not update until I manually go and change the shader in the UI. Is this a bug? Is there another means of changing the emission value?
Thanks!
Same here. Emission doesn't pulse using set Emission until I click in the inspector. Weird bug, or feature?
For anyone confused by the need to click on the inspector to make the emission value display, @vostok4's answer below solves it:
material.Enable$$anonymous$$eyword("_E$$anonymous$$ISSION");
Hi. Thank you so much for listing these. $$anonymous$$ay I ask where you found this information? Was it in the documentation, or in source files?
To control emissiveness in real time you need to change the _EmissionColor using script.
Or, you can select a material, right click, "select shader" and they will all be listed in your inspector. This DOES NOT WORK if you have Shaderforge installed, however. So St0Ff's little script will come in handy for those who use it.
Incidentally, I am attempting to turn on emmissive on my materials, the following doesn't work.
     private const string EmissiveValue = "_EmissionScaleUI";
     private const string EmissiveColour = "_EmissionColor";
 if (NightMaterials != null) {
                 foreach (Material nightMaterial in NightMaterials) {
                     //Color colour = nightMaterial.GetColor(EmissiveColour);
                     nightMaterial.SetFloat(EmissiveValue, 1);
                     //nightMaterial.SetColor(EmissiveColour, colour);
                     nightMaterial.globalIlluminationFlags = MaterialGlobalIlluminationFlags.RealtimeEmissive;
                     Debug.Log(nightMaterial.name + " Emmisive Value = " + nightMaterial.GetFloat(EmissiveValue));
                 }
             }
To change if Emissive is on or off in your material at runtime, use the "_E$$anonymous$$ISSION" shader keyword.
 // Turn on emission
 material.Enable$$anonymous$$eyword("_E$$anonymous$$ISSION");

 // Turn off emission
 material.Disable$$anonymous$$eyword("_E$$anonymous$$ISSION");
@vostok4 That's what I've been looking for, thanks. Do you know where we could get the list of keywords?
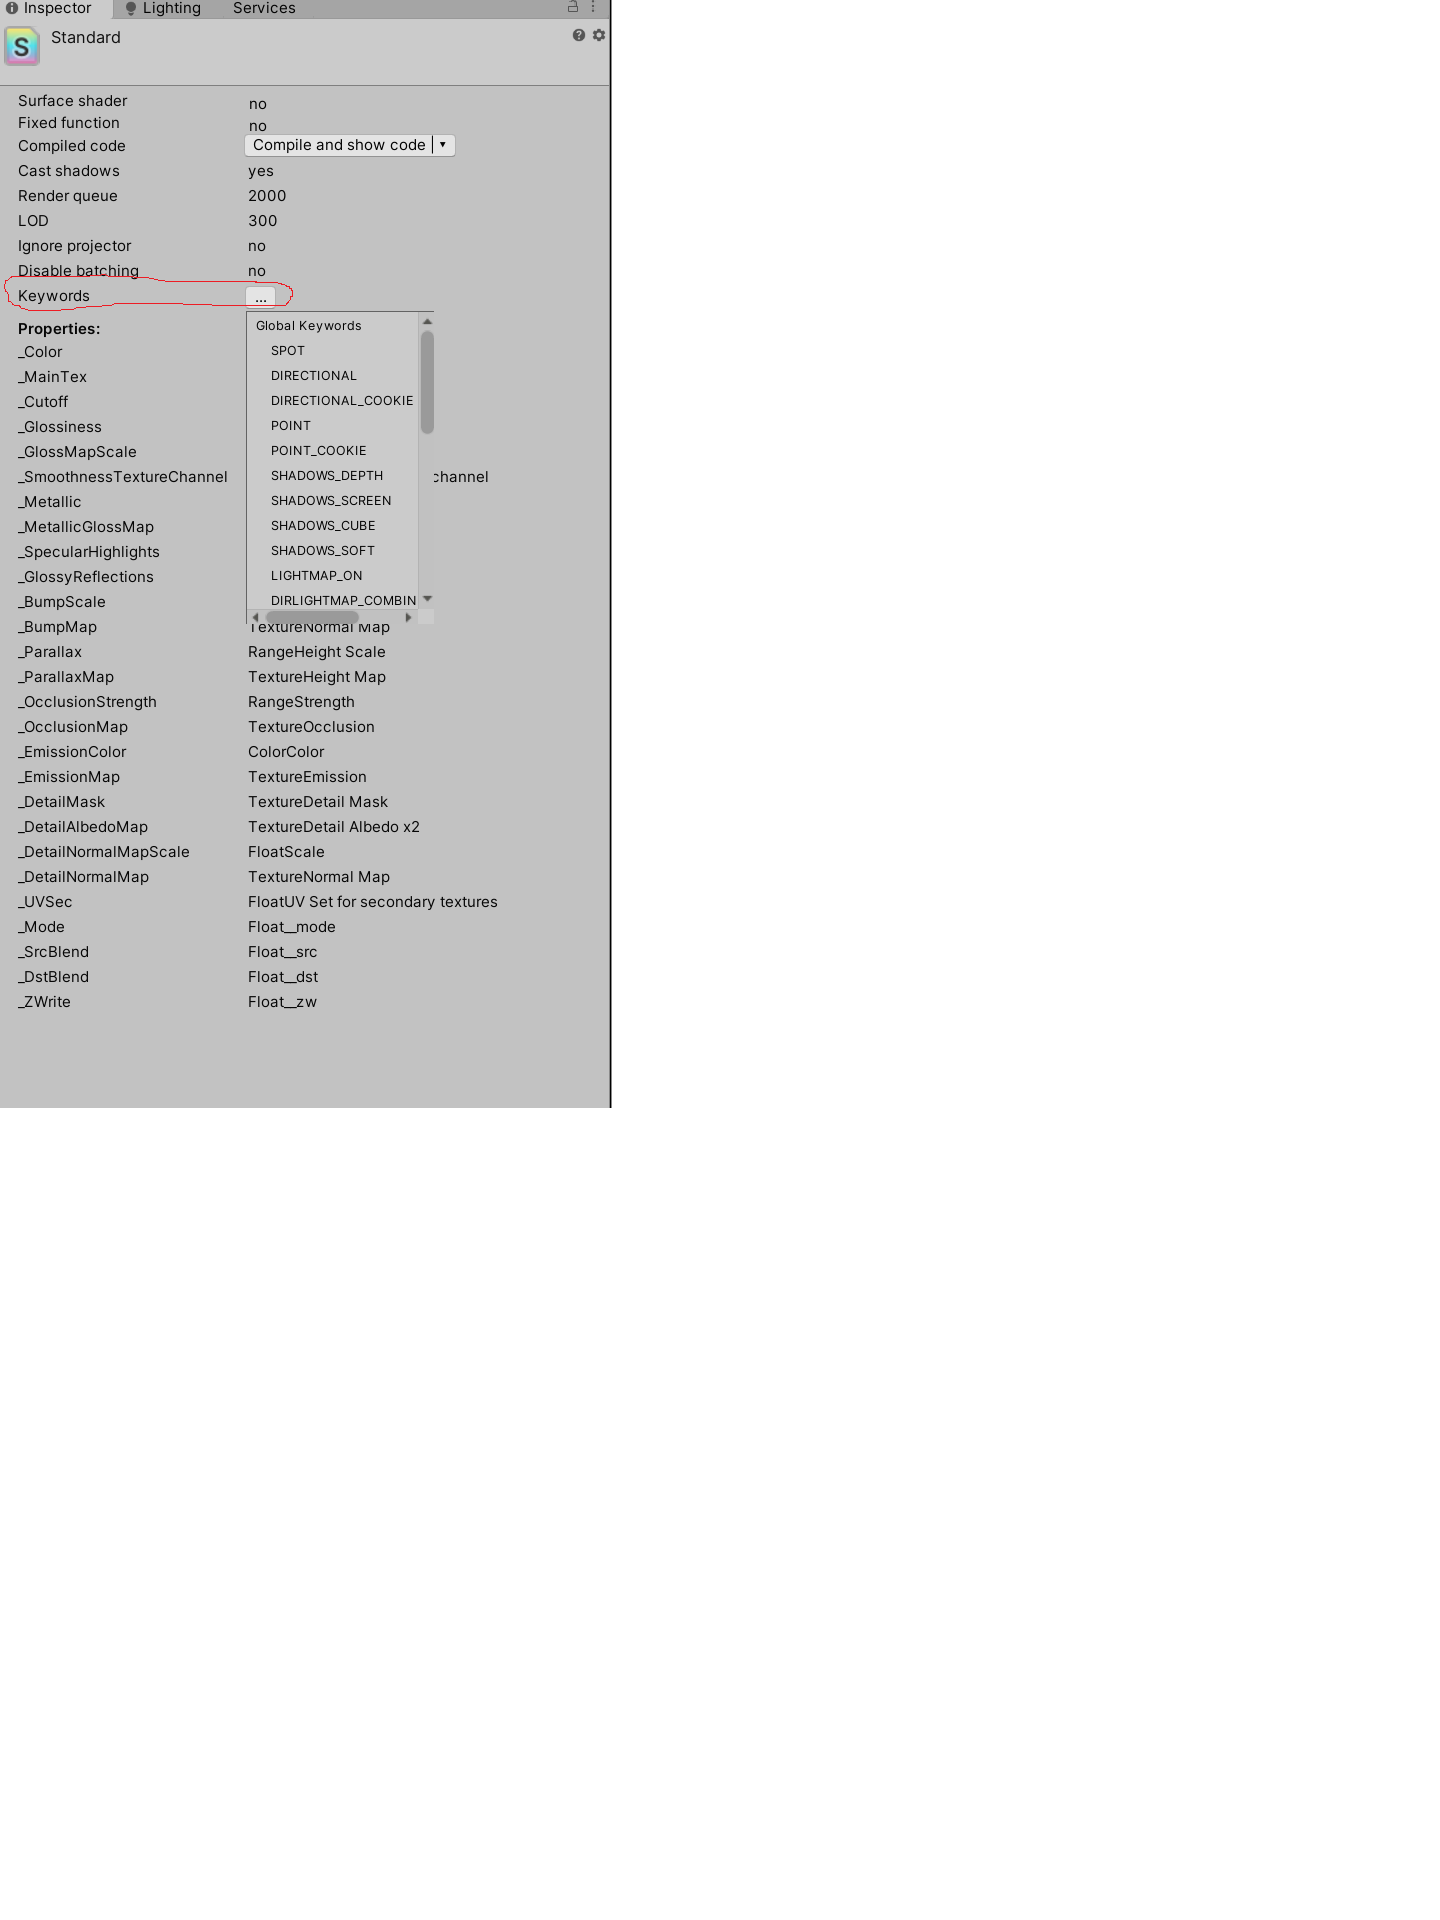 @xCyborg The keywords are found in the Edit Shader panel. Click on the three-dot button to expand the list.
// turn on emission shader flag material.EnableKeyword("_EMISSION");
// turn on realtime emissive GI material.globalIlluminationFlags = MaterialGlobalIlluminationFlags.RealtimeEmissive; material.SetColor("_EmissionColor", new Color(1.0f,1.0f,1.0f)); material.SetTexture("_EmissionMap"), TryLoadTexture(texturePath)); , // turn on emission shader flag material.EnableKeyword("_EMISSION");
// turn on realtime emissive GI material.globalIlluminationFlags = MaterialGlobalIlluminationFlags.RealtimeEmissive; material.SetColor("_EmissionColor", new Color(1.0f,1.0f,1.0f)); material.SetTexture("_EmissionMap"), TryLoadTexture(texturePath));
