Can I get this water effect in Unity(free)? Image inside.
I'm working with the new 2D tools for Unity. I have a water trigger and I am wondering if it's possible to get the camera to display a different hue of color when looking at the water trigger. I'm thinking that I can get the position of the water surface and then display a different hue under that y.position. It seems a little tricky though so I would appreciate a push in the right direction.
I wont use waves like they do as this would really complicate things. I wouldn't $$anonymous$$d my water surface being flat.
That's basically how I'm doing it (except $$anonymous$$e is 3D); once the y goes below a certain point while I'm in water, I mess with the renderer.fog and ambient light settings to fake it. Good luck!
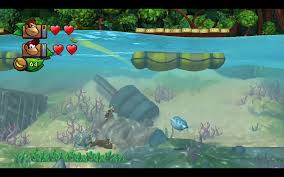
right except that in 3D the whole screen is in the water. Imagine your 3D character is on the shore and he slowly starts to walk into the water. At one point half of the screen will be underwater and the other half above the water. It's the same situation here, I need the camera to only display the effect under a point. Notice how there's a blue hue underwater in the image but above the surface everything looks normal.
Yep, I know what you mean. $$anonymous$$aybe you could turn on a second camera and adjust the viewport real-estate for cam1/2 based on the % of the Y compared to waterline
Hmm I see what you mean. Then when my character swims up or down, the viewport real-estate gets adjusted so that camera2("waterCam") is correctly sized.
Make 2 cameras, BelowWaterCam (with Depth set to 0) and AboveWaterCam (with Depth set to 1, and Clear Flags set to Depth only). Parent one camera to the other (doesn't matter which), and make sure they're facing the same direction and are in the same position. From here on out, in-game, only move the parent camera; the other one will automatically follow its position and orientation.
Make a new layer called BelowWaterMask. Set BelowWaterCam's Culling Mask not have BelowWaterMask checked. This means that any GameObjcets on the BelowWaterMask layer will not be rendered by BelowWaterCam.
Each frame, during OnPreRender(), enable / disable fog (or just change fog settings) as needed for each of these cameras. Refer here for an example. To match the screenshot, UnderWaterCam should have fog enabled and coloured cyan with its fogMode set to Linear and a fogEndDistance of something like 20-30. AboveWaterCam should have fog doing whatever you want it to do normally above water, if anything.
Use a material with a depth mask shader on a mesh that completely covers any below water stuff from your AboveWaterCam's view. For our purposes, open the shader's code and change Tags {"Queue" = "Geometry+10" } to Tags {"Queue" = "Geometry-10" } to make it mask out everything queued to render after Geometry (read up on Unity3D render queues if curious what render queues are). Create a new material that uses the depth mask shader. If you apply this material to an object, you'll notice it'll seem to go invisible in the Editor, and you'll see straight through it to Unity's default grey background (even if there's something behind your mesh!). This is normal, so don't worry.
With this change in place, a mesh with a material using the depth mask shader will now cut a hole in what a camera is rendering, as long as that mesh is in the camera's view frustrum. To make the mesh only block out stuff for the BelowWaterCam and not the AboveWaterCam, put the mesh's GameObject on the BelowWaterMask layer. This way, BelowWaterCam will not render the mesh, whereas AboveWaterCam will.
Optionally also have 2 projectors with a water caustic texture as the cookie, and make the projectors face downwards and rotate on the vertical axis at different rates. This makes a convincing moving water caustic pattern in my experience (for reference I use the technique in this game made for a small gamejam).
The strategy here is to render the scene twice, with two different fog settings. You draw the underwater version of the scene first (covering the full viewport), then draw the above water version of the scene on top of that, replacing it pixel by pixel.
The trick was cutting a hole in what the above water camera will render, leaving pixels of what is really underwater alone. This hole is cut using the depth mask shader and using layers to only cut that hole out of one camera's rendered scene.
I've been trying to do this the whole time. $$anonymous$$y problem was I put both cameras on the same depth with the hope that they would both display the layers assigned to their culling mask. I had cam 2 display everything in the underwater tag but it wasn't working. At least I had the right idea. Also I tried setting a separate fog for both cameras but anything I did affected the fog for both cameras. EDIT: Just checked out your demo and the water caustic effect is pretty good.
Stuff to do with fog is part of the RenderSettings class, the members of which are static - meaning changes to them apply to all cameras when you change them. This is why you need the script that changes render settings during OnPreRender() for your underwater camera, then reverts them during OnPostRender(). Each camera is rendered one after the other (calling OnPreRender(), then doing the render, then calling OnPostRender()), so using OnPreRender() to change fog settings and OnPostRender() to revert those changes will avoid the issue of affecting other cameras with said changes.
$$anonymous$$y code for this was in C#, and was this:
 using UnityEngine;
 using System.Collections;

 public class SetFogSettings : $$anonymous$$onoBehaviour {

     public bool fog;
     public Color fogColor;
     public float fogDensity;
     public Fog$$anonymous$$ode fog$$anonymous$$ode;
     public float fogStartDistance;
     public float fogEndDistance;
     public Color ambientLight;

     private bool oldFog;
     private Color oldFogColor;
     private float oldFogDensity;
     private Fog$$anonymous$$ode oldFog$$anonymous$$ode;
     private float oldFogStartDistance;
     private float oldFogEndDistance;
     private Color oldAmbientLight;

     void OnPreRender () {
         oldFog = RenderSettings.fog;
         oldFogColor = RenderSettings.fogColor;
         oldFogDensity = RenderSettings.fogDensity;
         oldFog$$anonymous$$ode = RenderSettings.fog$$anonymous$$ode;
         oldFogStartDistance = RenderSettings.fogStartDistance;
         oldFogEndDistance = RenderSettings.fogEndDistance;
         oldAmbientLight = RenderSettings.ambientLight;

         RenderSettings.fog = fog;
         RenderSettings.fogColor = fogColor;
         RenderSettings.fogDensity = fogDensity;
         RenderSettings.fog$$anonymous$$ode = fog$$anonymous$$ode;
         RenderSettings.fogStartDistance = fogStartDistance;
         RenderSettings.fogEndDistance = fogEndDistance;
         RenderSettings.ambientLight = ambientLight;
     }

     void OnPostRender () {
         RenderSettings.fog = oldFog;
         RenderSettings.fogColor = oldFogColor;
         RenderSettings.fogDensity = oldFogDensity;
         RenderSettings.fog$$anonymous$$ode = oldFog$$anonymous$$ode;
         RenderSettings.fogStartDistance = oldFogStartDistance;
         RenderSettings.fogEndDistance = oldFogEndDistance;
         RenderSettings.ambientLight = oldAmbientLight;
     }
 }
btw I have to read up on some stuff. While I get your answer I don't really know how to complete it. I've also been at this all day so I think my $$anonymous$$d is worn out for now. Rest assured I will try all of your suggestions and if they work I'll mark your answer as correct.
