Wayback Machinekoobas.hobune.stream
May JUN Jul
Previous capture 13 Next capture
2021 2022 2023
1 capture
13 Jun 22 - 13 Jun 22
sparklines
Close Help
  • Products
  • Solutions
  • Made with Unity
  • Learning
  • Support & Services
  • Community
  • Asset Store
  • Get Unity

UNITY ACCOUNT

You need a Unity Account to shop in the Online and Asset Stores, participate in the Unity Community and manage your license portfolio. Login Create account
  • Blog
  • Forums
  • Answers
  • Evangelists
  • User Groups
  • Beta Program
  • Advisory Panel

Navigation

  • Home
  • Products
  • Solutions
  • Made with Unity
  • Learning
  • Support & Services
  • Community
    • Blog
    • Forums
    • Answers
    • Evangelists
    • User Groups
    • Beta Program
    • Advisory Panel

Unity account

You need a Unity Account to shop in the Online and Asset Stores, participate in the Unity Community and manage your license portfolio. Login Create account

Language

  • Chinese
  • Spanish
  • Japanese
  • Korean
  • Portuguese
  • Ask a question
  • Spaces
    • Default
    • Help Room
    • META
    • Moderators
    • Topics
    • Questions
    • Users
    • Badges
  • Home /
avatar image
0
Question by kiwi koder · Jun 14, 2013 at 09:32 AM · guihud

GUI HUD Problem

I am trying to create an angle setter HUD for my game using GUI but I am unsure of how to go forward. What I want to be able to do it for the player to click and drag the red bar of the image below so it moves and changes the angle of the bar around the pivot point of the bottom left hand corner of the image. Then I want it to return the angle that has been set. Any suggestions? Thanks for any input :)

Edit: After more research I know that the rotation is not possible with the red bar so what is another way I could do this?

alt text

anglegui-mockup.png (7.1 kB)
Comment
Add comment · Show 1
10 |3000 characters needed characters left characters exceeded
▼
  • Viewable by all users
  • Viewable by moderators
  • Viewable by moderators and the original poster
  • Advanced visibility
Viewable by all users
avatar image bodec · Jun 14, 2013 at 10:38 AM 0
Share

make a 3d object place over the green and then I think lerp would be the function to use on y axis leaving the x and z axis alone(assu$$anonymous$$g you are looking top down over the game)

1 Reply

· Add your reply
  • Sort: 
avatar image
1
Best Answer

Answer by fafase · Jun 14, 2013 at 11:15 AM

Well, here is one way to do it, there are probably many other way and maybe even better than this one:

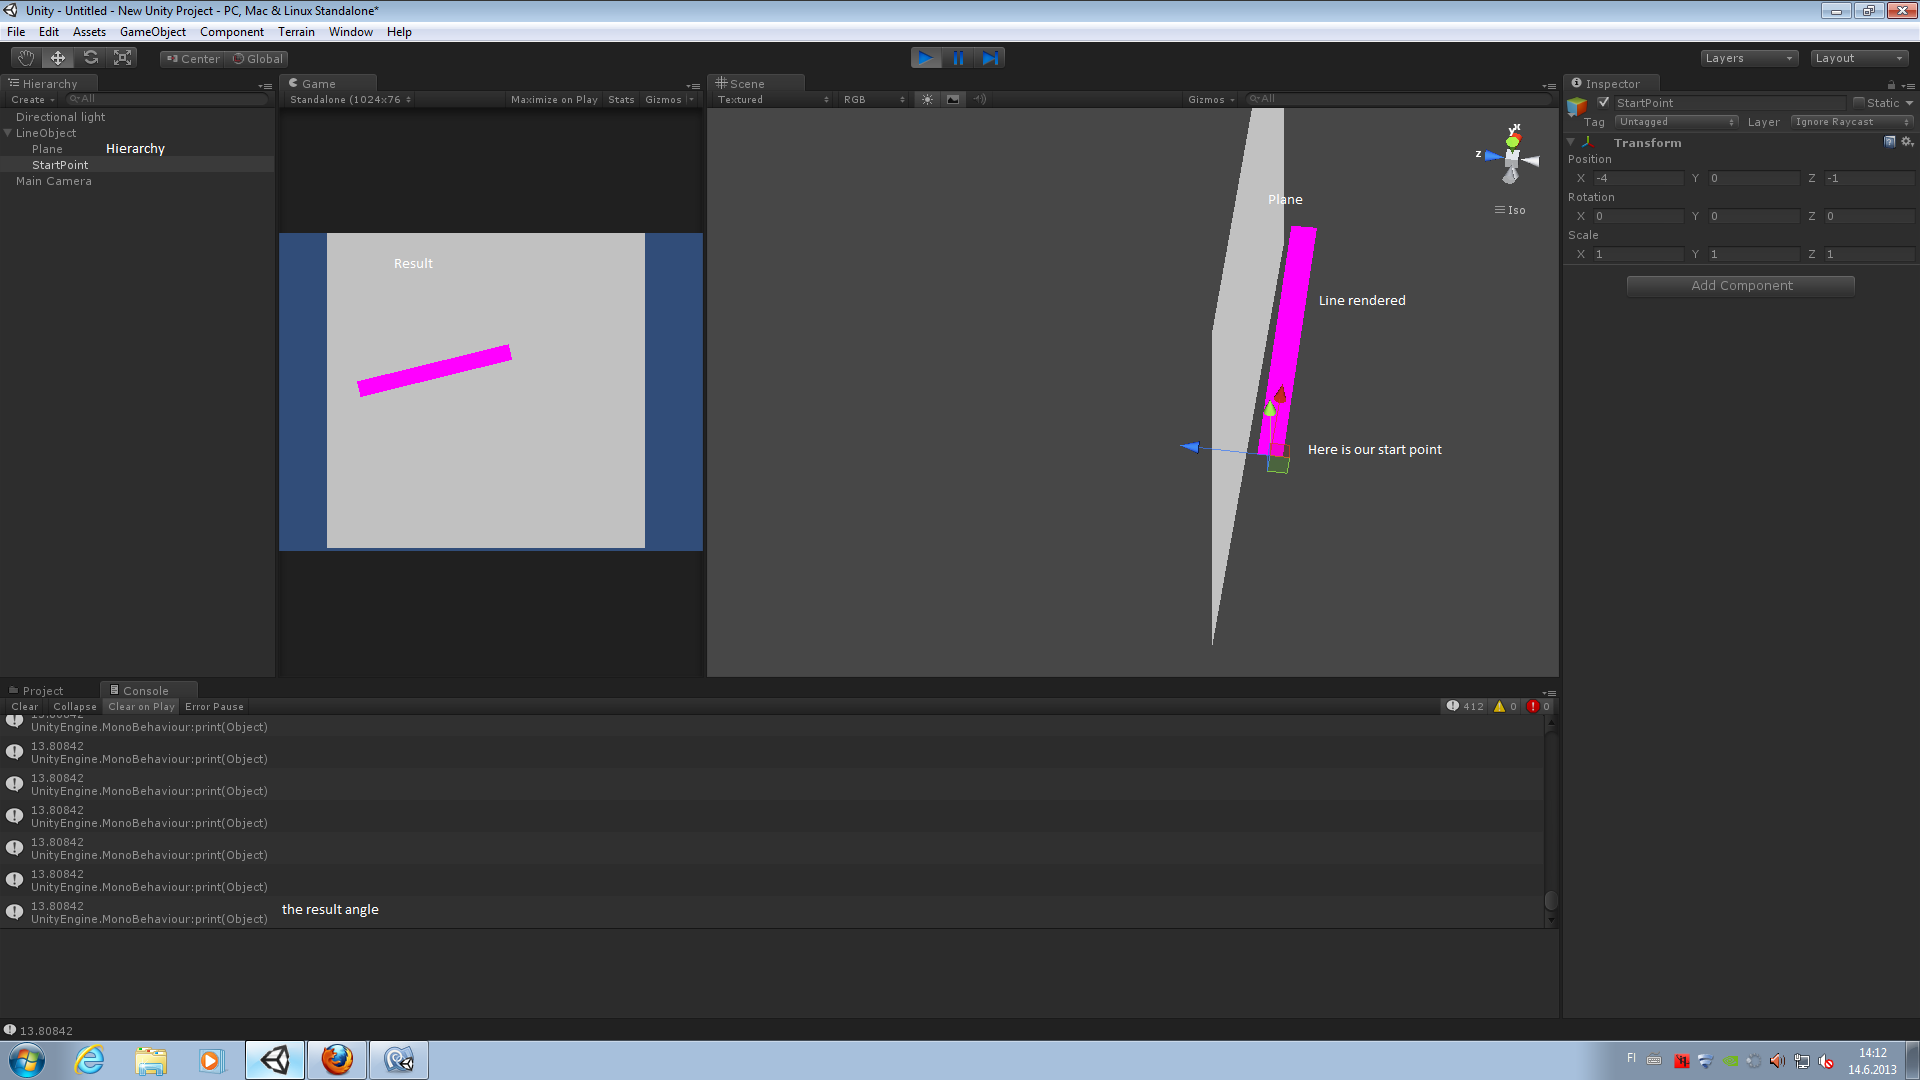
Create an empty game object, add as children a plane and a point. The plane is the background (so you can apply a texture to it), tag it as plane. The point will be the starting position of the line so position it where you want the pivot point.

Add a line renderer to the main object and this script below:

 LineRenderer line;
 public Transform start;
 float angle;
 float distance = 5f;
 Vector3 origin;
 
 void Start () {
     line = GetComponent();
     line.SetWidth(0.5f,0.5f);
     line.SetVertexCount(2);
     line.SetPosition(0,start.position);
     origin = start.position + Vector3.right*distance;
     line.SetPosition(1,origin);    
 }
 void Update () {
     RaycastHit hit;
     Ray ray = Camera.main.ScreenPointToRay(Input.mousePosition);
     Vector3 finalVec;
     if(Physics.Raycast(ray,out hit)){
         if(hit.collider.tag == "Plane"){
             Vector3 norm = (hit.point - start.position).normalized;
             Vector3 distVec = norm * distance;
             finalVec = distVec + start.position;
             finalVec.z = start.position.z;
             line.SetPosition(1,finalVec);
             angle = Vector3.Angle ((finalVec - start.position), (origin - start.position));
         }
         print (angle);
     }
 }

You need to drag and drop the point into start.

This section below is only if you care about learning, else just copy paste.

Now what it does:

We fetch the line renderer and start setting information. 0.5 of width, 2 vertices (start and end), then we set the vertex 0 (start) to be at the position of our pivot point. We define origin to be the original vector which is our position and 5 (distance) times to the right (note that this will depend on the orientation of your system).

Now we are set up.

The update checks for raycast with the plane and if so, creates a vector between the pivot point and the hit point on the plane, normalizes that vector and extend with the distance. This is so that we always get the same vector length.

We offset the z position so that our line renderer is not inside the plane but in front of it.

Finally, we set our end position (vertex 1) of our line renderer. We are done for the visual part.

For the calculation part, we use the Angle between the two vectors start to finalVec, start to origin and we get our angle.

alt text

Thank you.


untitled.png (121.1 kB)
Comment
Add comment · Show 1 · Share
10 |3000 characters needed characters left characters exceeded
▼
  • Viewable by all users
  • Viewable by moderators
  • Viewable by moderators and the original poster
  • Advanced visibility
Viewable by all users
avatar image kiwi koder · Jun 15, 2013 at 04:52 AM 0
Share

Great answer!! Would up vote 20 times if I was allowed! Cheers

Your answer

Hint: You can notify a user about this post by typing @username

Up to 2 attachments (including images) can be used with a maximum of 524.3 kB each and 1.0 MB total.

Follow this Question

Answers Answers and Comments

14 People are following this question.

avatar image avatar image avatar image avatar image avatar image avatar image avatar image avatar image avatar image avatar image avatar image avatar image avatar image avatar image

Related Questions

How to position 3D-GUI-Mesh on change of aspect ratio? 0 Answers

Multi Camera HUD buttons not working. 1 Answer

Best way to create mini hp-bars for enemies. 1 Answer

GUI Question please help. 2 Answers

Any idea why my int wont display on GUI 1 Answer


Enterprise
Social Q&A

Social
Subscribe on YouTube social-youtube Follow on LinkedIn social-linkedin Follow on Twitter social-twitter Follow on Facebook social-facebook Follow on Instagram social-instagram

Footer

  • Purchase
    • Products
    • Subscription
    • Asset Store
    • Unity Gear
    • Resellers
  • Education
    • Students
    • Educators
    • Certification
    • Learn
    • Center of Excellence
  • Download
    • Unity
    • Beta Program
  • Unity Labs
    • Labs
    • Publications
  • Resources
    • Learn platform
    • Community
    • Documentation
    • Unity QA
    • FAQ
    • Services Status
    • Connect
  • About Unity
    • About Us
    • Blog
    • Events
    • Careers
    • Contact
    • Press
    • Partners
    • Affiliates
    • Security
Copyright © 2020 Unity Technologies
  • Legal
  • Privacy Policy
  • Cookies
  • Do Not Sell My Personal Information
  • Cookies Settings
"Unity", Unity logos, and other Unity trademarks are trademarks or registered trademarks of Unity Technologies or its affiliates in the U.S. and elsewhere (more info here). Other names or brands are trademarks of their respective owners.
  • Anonymous
  • Sign in
  • Create
  • Ask a question
  • Spaces
  • Default
  • Help Room
  • META
  • Moderators
  • Explore
  • Topics
  • Questions
  • Users
  • Badges