Animated FBX from Maya to Unity – flipped normals and more
HI!
I have a problem with exporting an animated character from Maya to Unity. Character consists of few separate objects, all parented to the body.
Please help, I have to fix this problem as soon as possible. I'm using Maya 2017 and Unity 2019.4.18f1.
First of all – in
Unitysome elements look strange - everything looks great inMaya, but inUnityit looks like it's a problem with flipped normals. It would make sense, because I used mirror modifiers with these objects (mesh was created inBlender). Turningbackface-cullingon doesn't change anything, deleting theNon-Deformer Historydoes not help. I am unable to solve this problem.Secondly - I have to modify animated mesh – it has to have more polygons but I would still like to have a hard edge effect. Later, I would like to add more body elements.
I thought about using smooth in Maya, but the exported model in Unity is not smoothed at all (or only body is smoothed). I tried checking/unchecking Smoothing groups and Smooth Mesh option on FBX export in Maya, but it does not change anything.
I'm so desperate that I wanted to add a subdivision modifier in Blender and then try to attach this new mesh to Maya animation, but I can't even try because Maya imports everything except the character's head and jaws. Even when I import only the head, nothing new appears on stage and in Outliner.
It happens only in a Document with animation. Exported mesh from Blender imports perfectly into a new Maya Document.
I am resigned and devastated, I have no ideas anymore but I need to get it done as soon as possible. I beg for some help and possible suggestions.
monster.fbx + maya2017exp.log
It would help a lot if you could post a small asset that reproduces your issue clearly. Something like a small portion of your mesh exported as FBX + it's .meta file (for import config) + normal map (watermarked if needed) would be great
Thank you soo much for your time! I'm sending FBX file + export log.
I'm new to the forums and I'm surprised I cannot attach fbx file here! Here is a download link: https://we.tl/t-o1jYg4qBPd
If the model is made in Blender and then imported to Maya in Blender, press w key and use normal flip or with ctrl + n, first enter edit mode (TAB key)
Thank you for your time! The problem is that mesh exported from Blender does not have such weird look in Unity. It seems like there's something wrong going on in between Blender and Unity, indicating there is some problem with Maya export.
Assu$$anonymous$$g this Fbx represents what you see in unity:
I see hard-shading enabled and if this is not intentional it will make normal map (very) mismatched with it's geometry resulting it a messed-up lighting.
Sidenote: a single animated mesh (or as few as possible) is usually preferred for performance reasons.

Shading results in unity:

Sadly, in Blender my animated mesh looks like just a bunch of chaotically stretched polygons and this is what it looks like in Unity: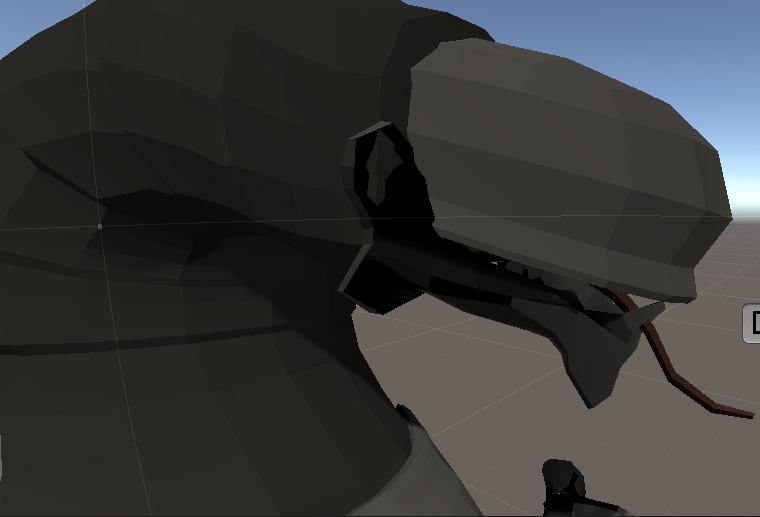
This is how my model should be (download mesh without animation): https://we.tl/t-7DWqpLS6LU alt text
Sorry if I was writing in chaotic manner but the thing is: my worst problem are these flipped normals. Second problem is I cannot thicken the model mesh (smoothing was just an unsuccessful trial) but I need the edges to be sharp, not smooth.
I apologize for being unclear and I am more than grateful for taking the time to address my problem!
I have good/bad new :) It's not normal maps. It's UV layout that is at fault here.
I'm no artist, but I can tell this is not how good UVs look like:


When you apply a checker texture on any correctly uv-mapped mesh it should look like this box, meaning:
(more or less) uniform pixel distribution
no rectangles (stripes especially!), squares only
(Rectangles are pixels being stretched along one axis which will look bad)
diamond-like shapes are unavoidable (for organic meshes), because of rotations
What happens in your case is that you mapped something like 8 pixels to represent 40% of the surface :T not ideal
If you use windows 10 then there is a this 3D Viewer app (often pre-installed I believe). It is one of the faster ways to check your FBX meshes. Just switch to Stats & Shading tab and click UV Set 0.
Also useful, this
Material IDsshows you the number of materials (draw calls) model uses. Long story short:1is most desirable, everything other than that will be frowned upon by tech artists and programmers, in direct proportion to the number itself.
 As you can see Its hard to find a spot on the mesh that is uv-mapped correctly. Strange flickering, stripes and rectangles are all over the place.
Black faces means geometry normals are inverted there. Flip them on those parts because it breaks lighting there and normal maps with it as well.
Powodzenia
Thank you so much for all this information! Very helpful, I didn't know there is 3D Viewer app in Win10. Dzięki :)
However, I think my problem was not only with the UVs. I guess something went wrong while exporting from Blender to Maya. Don't know what exactly but I was able to solve it by selecting all problematic polygons in Maya and clicking Set to Face, then Conform (in Mesh Display menu). Then I clicked Cache> Alembic> Export All to Alembic. Next I opened new scene in Maya and imported this newly created .abc file. I exported to Unity and everything is looking good from now on.
I am sooo thankful for any help and I hope my case can help somebody else with similar problem!
