Wayback Machinekoobas.hobune.stream
May JUN Jul
Previous capture 13 Next capture
2021 2022 2023
1 capture
13 Jun 22 - 13 Jun 22
sparklines
Close Help
  • Products
  • Solutions
  • Made with Unity
  • Learning
  • Support & Services
  • Community
  • Asset Store
  • Get Unity

UNITY ACCOUNT

You need a Unity Account to shop in the Online and Asset Stores, participate in the Unity Community and manage your license portfolio. Login Create account
  • Blog
  • Forums
  • Answers
  • Evangelists
  • User Groups
  • Beta Program
  • Advisory Panel

Navigation

  • Home
  • Products
  • Solutions
  • Made with Unity
  • Learning
  • Support & Services
  • Community
    • Blog
    • Forums
    • Answers
    • Evangelists
    • User Groups
    • Beta Program
    • Advisory Panel

Unity account

You need a Unity Account to shop in the Online and Asset Stores, participate in the Unity Community and manage your license portfolio. Login Create account

Language

  • Chinese
  • Spanish
  • Japanese
  • Korean
  • Portuguese
  • Ask a question
  • Spaces
    • Default
    • Help Room
    • META
    • Moderators
    • Topics
    • Questions
    • Users
    • Badges
  • Home /
avatar image
0
Question by dlynch13 · Aug 05, 2012 at 08:55 PM · editorcomponentsrigidbodieshinge

How to attach components to rigidbodies in editor

I have been reading about hinge joints and I want to use them to attach boxes to random points on a cylinder. How do I "attach" things in the editor? I know how to add components to individual objects, but I don't know how to tie two objects together. I just need the step-by-step guide of the mouse clicks I need to do.

In the picture provided, I want the cubes to stay where they are relative to the cylinder as it moves/rotates. I already have the "LookAtCamera" script which keeps the boxes faces in view. Now I just need to figure out how to build the hinge between these objects.

Edit: The first answer provided was so simple it eluded me...to drag the cubes onto the cylinder in the editor. That locks the two items together during runtime, correct? So do I add hinge components to the little red boxes to let them rotate freely? How do I pick the hinge points? Do I have to provide the numbers or is there a mouse point-n-click operation?

Links to tutorials that build scenes/objects/characters would help out a ton. Thanks!

alt text

disc.png (101.1 kB)
Comment
Add comment
10 |3000 characters needed characters left characters exceeded
▼
  • Viewable by all users
  • Viewable by moderators
  • Viewable by moderators and the original poster
  • Advanced visibility
Viewable by all users

1 Reply

· Add your reply
  • Sort: 
avatar image
0

Answer by OperationDogBird · Aug 05, 2012 at 09:20 PM

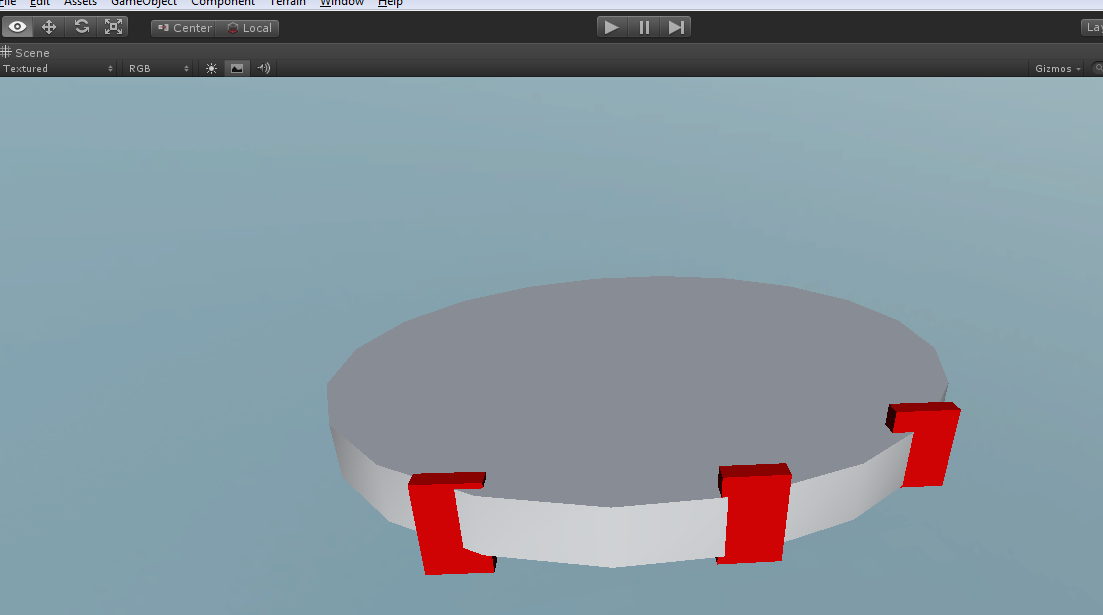
All you need to do is drag those objects onto the cylinder object so that they are children of it.

In Hierarchy, click on a 'box' you want to attach, drag onto the cylinder, done.

You dont need LookAt in this case since they are already in the correct rotation.

Comment
Add comment · Show 2 · Share
10 |3000 characters needed characters left characters exceeded
▼
  • Viewable by all users
  • Viewable by moderators
  • Viewable by moderators and the original poster
  • Advanced visibility
Viewable by all users
avatar image dlynch13 · Aug 06, 2012 at 04:32 AM 0
Share

Simple! That explains why I couldn't find any questions out there already. But now the cylinder and cubes are locked together, as one, right? I edited my question to ask how to finish the hinge-ing operation. Thanks!

avatar image OperationDogBird · Aug 06, 2012 at 05:32 AM 0
Share

Im not sure exactly what you are doing, but from what i can tell you are using this like the lid of a trash can. You can rotate the entire object based on the pivot of the center red box. This will require a couple lines of scripting to alter the rotation of the object along the x axis.

Heres the tasks at hand:

Find the center box object inside the cylinders children (Use Transform.GetChild or Transform.Find)

Create an empty GameObject and place its transform.position at that boxes transform.position, then parent the cylinder to this new GO. This will be the new pivot point.

Rotate the pivot object and all will follow(you can use transform.Rotate)

Your answer

Hint: You can notify a user about this post by typing @username

Up to 2 attachments (including images) can be used with a maximum of 524.3 kB each and 1.0 MB total.

Follow this Question

Answers Answers and Comments

8 People are following this question.

avatar image avatar image avatar image avatar image avatar image avatar image avatar image avatar image

Related Questions

Unity editor bugging out 4 Answers

Transform component of Inspector panel changes 1 Answer

Is it Possible to Make RequiredComponents appear at the bottom of all components in the Inspector Window? 0 Answers

how to clone several game objects in a way that clone properties of one can be adjusted to match all others in scene view 1 Answer

Component values don't get assigned 0 Answers


Enterprise
Social Q&A

Social
Subscribe on YouTube social-youtube Follow on LinkedIn social-linkedin Follow on Twitter social-twitter Follow on Facebook social-facebook Follow on Instagram social-instagram

Footer

  • Purchase
    • Products
    • Subscription
    • Asset Store
    • Unity Gear
    • Resellers
  • Education
    • Students
    • Educators
    • Certification
    • Learn
    • Center of Excellence
  • Download
    • Unity
    • Beta Program
  • Unity Labs
    • Labs
    • Publications
  • Resources
    • Learn platform
    • Community
    • Documentation
    • Unity QA
    • FAQ
    • Services Status
    • Connect
  • About Unity
    • About Us
    • Blog
    • Events
    • Careers
    • Contact
    • Press
    • Partners
    • Affiliates
    • Security
Copyright © 2020 Unity Technologies
  • Legal
  • Privacy Policy
  • Cookies
  • Do Not Sell My Personal Information
  • Cookies Settings
"Unity", Unity logos, and other Unity trademarks are trademarks or registered trademarks of Unity Technologies or its affiliates in the U.S. and elsewhere (more info here). Other names or brands are trademarks of their respective owners.
  • Anonymous
  • Sign in
  • Create
  • Ask a question
  • Spaces
  • Default
  • Help Room
  • META
  • Moderators
  • Explore
  • Topics
  • Questions
  • Users
  • Badges