Apply a bumped shader on top of a custom vertex shader
Hi,
I am working on a custom vertex shader which will modify the position of a mesh vertices according to time and other parameters.
But I'd like to keep the "visual" shader already attached to my mesh (in my case a Bumped Diffuse shader).
I tried something like this:
 Shader "Custom/Test" {
     SubShader {
         Pass {
             CGPROGRAM

             #pragma vertex vert
             #pragma fragment frag

             struct VertStruct
              {
                  float4 position : POSITION;
                  float4 color : COLOR;
              };

             VertStruct vert(VertStruct v) {
                 v.position.x *= 2.0f;
                 v.position.y *= 0.5f;
                 v.position.z *= 0.5f;

                 VertStruct output;
                 output.position = mul(UNITY_MATRIX_MVP, v.position);
                 output.color = v.color;
                 return output;
             }

             fixed4 frag(float4 color : COLOR) : COLOR {
                 return color;
             }

             ENDCG
         }
     }
 }
But instead of having my mesh go through the two shaders one after the other, it's rendered twice in the scene: 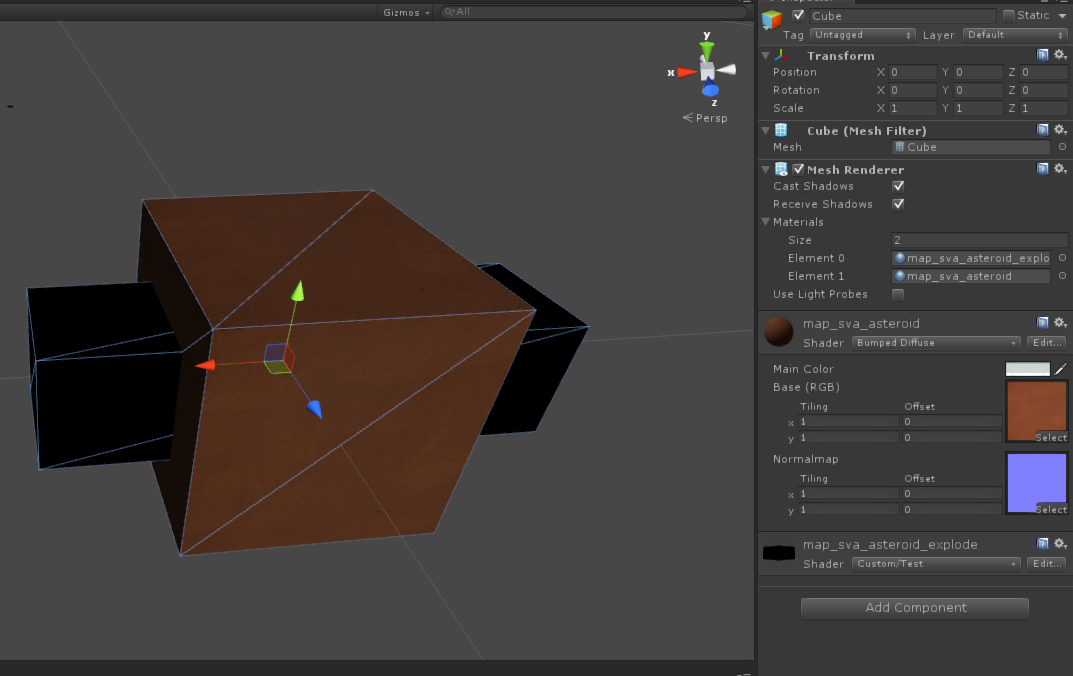
How can I apply the bumped diffuse shader and THEN, apply my custom vertex shader on top of that (or the other way around)?
Your image doesn't show in the question, but I can sort of imagine what it looks like.
Having it go through two shaders, one after the other, IS to render it twice. There is no difference in that regard, it's like having multiple materials on the renderer, or designing a shader that has multiple passes. Each pass, or each material, will send the object through the pipeline once, causing it to render. That's how the pipeline works. :)
What you need to do instead is to add your custom vertex shader to the standard bump mapping shader. This is pretty easy to do, but requires a little bit of preparation. First, acquire the source to the built-in shaders. There's a download link next to the editor's at this link:
http://unity3d.com/unity/download/archive
Find the surface shader source for the bump mapped shader you need. There are multiple different ones, depending on whether you need to modify the Bump Diffuse, Bump Specular, Transparent Bumped Diffuse, Transparent Bumped Specular, etc.
Suppose it's the bumped specular you want. The source code for that shader looks like this:
 Shader "Bumped Specular" {
 Properties {
     _Color ("Main Color", Color) = (1,1,1,1)
     _SpecColor ("Specular Color", Color) = (0.5, 0.5, 0.5, 1)
     _Shininess ("Shininess", Range (0.03, 1)) = 0.078125
     _MainTex ("Base (RGB) Gloss (A)", 2D) = "white" {}
     _BumpMap ("Normalmap", 2D) = "bump" {}
 }
 SubShader {
     Tags { "RenderType"="Opaque" }
     LOD 400

 CGPROGRAM
 #pragma surface surf BlinnPhong


 sampler2D _MainTex;
 sampler2D _BumpMap;
 fixed4 _Color;
 half _Shininess;

 struct Input {
     float2 uv_MainTex;
     float2 uv_BumpMap;
 };

 void surf (Input IN, inout SurfaceOutput o) {
     fixed4 tex = tex2D(_MainTex, IN.uv_MainTex);
     o.Albedo = tex.rgb * _Color.rgb;
     o.Gloss = tex.a;
     o.Alpha = tex.a * _Color.a;
     o.Specular = _Shininess;
     o.Normal = UnpackNormal(tex2D(_BumpMap, IN.uv_BumpMap));
 }
 ENDCG
 }

 FallBack "Specular"
 }
Now, what you want is to add your custom vertex shader to that. There's an example of how to do so in the Surface Shader examples at this link:
http://docs.unity3d.com/Manual/SL-SurfaceShaderExamples.html
Under the section "Normal extrusion with vertex modifyer". But in short, you need to define your vertex function after the surface function declaration by adding "vertex:vert" after the lighting function name, if your vertex function is called vert. Doing so would change the specular bump mapped shader to this:
 Shader "Bumped Specular" {
 Properties {
     _Color ("Main Color", Color) = (1,1,1,1)
     _SpecColor ("Specular Color", Color) = (0.5, 0.5, 0.5, 1)
     _Shininess ("Shininess", Range (0.03, 1)) = 0.078125
     _MainTex ("Base (RGB) Gloss (A)", 2D) = "white" {}
     _BumpMap ("Normalmap", 2D) = "bump" {}
 }
 SubShader {
     Tags { "RenderType"="Opaque" }
     LOD 400

 CGPROGRAM
 #pragma surface surf BlinnPhong vertex:vert


 sampler2D _MainTex;
 sampler2D _BumpMap;
 fixed4 _Color;
 half _Shininess;

 struct Input {
     float2 uv_MainTex;
     float2 uv_BumpMap;
 };

 void vert (inout appdata_full v) {
     // Your custom vertex shader code goes here
 }

 void surf (Input IN, inout SurfaceOutput o) {
     fixed4 tex = tex2D(_MainTex, IN.uv_MainTex);
     o.Albedo = tex.rgb * _Color.rgb;
     o.Gloss = tex.a;
     o.Alpha = tex.a * _Color.a;
     o.Specular = _Shininess;
     o.Normal = UnpackNormal(tex2D(_BumpMap, IN.uv_BumpMap));
 }
 ENDCG
 }

 FallBack "Specular"
 }
That shader is the same as the standard bump mapped specular shader, just prepared for your custom vertex shader code.
Hope this helps. You should be able to complete your shader with this.
I thought of this solution but did not think it would be the best one, because it causes code to be duplicated and not updated if Unity updates its shaders (even though it might happen very rarely).
Too bad we cannot call a shader function from another. I'm still new in writing shaders, so I have difficulties understanding the workflow of it.
Thank you very much!
You can call a shader function from another, but it depends perhaps on what you mean by "shader function". If you're talking about defining a function to be accessible in other shaders, you can just define it in a cginc-file, and then include that in your shader. That's what Unity itself does with its file "UnityCG.cginc".
If you mean you wish to use a pass defined in another shader, you can do so too: It requires only that the target shader's pass be named (has a "Name" tag), and that you call it with the "usepass" syntax in the calling shader.
But if you want to totally dynamically combine different shaders with separate passes into a single pass through the pipeline... That's not possible, and the notion doesn't apply to the whole pass design.
