- Home /
How can I prevent lights overlapping in intensity?
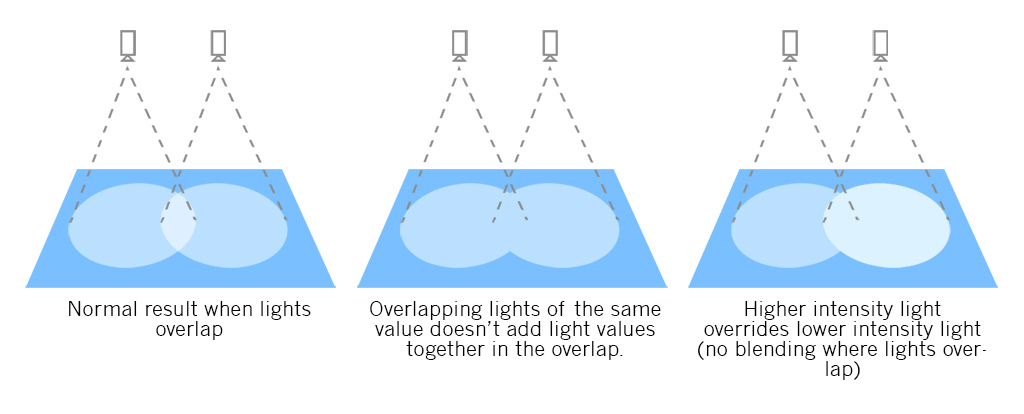
Whenever lights get close to each other their intensities combine, making objects around them brighter than if only one light was present. I understand that this is realistically what should happen, but I only want objects to get so bright. Here is a picture to help explain:

Is there a way to create the center scenario? A certain option or shader that I have not found? Should I learn ShaderLab if it is possible to solve the problem by creating a custom shader?
Have you tried to set the rendermode property (in the inspector) of both lights to 'Important' ins$$anonymous$$d of 'Auto' ?
Answer by Benjamin_Overgaard · Aug 09, 2017 at 02:31 PM
You can achieve the scenario in the middle and on the right using blending operations in your shader code, which is easy to do even though you don't know how to write shaders.
Scroll down to the "Blend operations" section in this link: https://docs.unity3d.com/Manual/SL-Blend.html
Specifically BlendOp Max gives you want you want. It makes the light with the higher intensity override the lower intensity light, and if the two lights have the same intensities, the overlap is not visible.
Where to add this piece of shader code depends on if you are using forward of deferred rendering, since the way these render modes calculate lighting is very different, and in order to make this fix, we need to change how light blends. In forward rendering, you can add it directly in the vertex and fragment shader used on the object, as each shader can have its own lighting model. In deferred rendering however, shaders use a shared lighting model, which is a bit more behind the scenes and trickier to find.
Forward rendering - In the ForwardAddPass of your shader, add 'BlendOp Max' as such:
 Pass {
             Name "FORWARD_DELTA"
             Tags {
                 "LightMode"="ForwardAdd"
             }
             BlendOp Max


             CGPROGRAM
             #pragma vertex vert
             #pragma fragment frag
             #define UNITY_PASS_FORWARDADD
...and so on...
Deferred rendering - You can find the shader with the deferred lighting model by following this description (https://docs.unity3d.com/Manual/RenderTech-DeferredShading.html): "The only lighting model available is Standard. If a different model is wanted you can modify the lighting pass shader, by placing the modified version of the Internal-DeferredShading.shader file from the Built-in shaders into a folder named “Resources” in your “Assets” folder. Then go to the Edit->Project Settings->Graphics window. Changed the “Deferred” dropdown to “Custom Shader”. Then change the Shader option which appears to the shader you are using."
In the Internal-DeferredShading shader, you can then add the blending operation in the first pass, which is the lighting pass, as such:
 SubShader {

 // Pass 1: Lighting pass
 //  LDR case - Lighting encoded into a subtractive ARGB8 buffer
 //  HDR case - Lighting additively blended into floating point buffer
 Pass {
     ZWrite Off
     Blend [_SrcBlend] [_DstBlend]

     //OUR Hack: Choose the light with the highest intensity. Non-additive.
     BlendOp Max

 CGPROGRAM
 #pragma target 3.0
 #pragma vertex vert_deferred
I hope this works on your end :)
Your answer

Follow this Question
Related Questions
Tracing in Unity3D 2 Answers
Double sided shader lighting problem? 1 Answer
Light based texture change on material 0 Answers
How to lighten/darken a greyscale shader 0 Answers
