How to limit the types shown at the inspector in a public enum based on another public enum type selected?
I´m making a Turn Based "Mario RPG style" game and have created a script to contain all the special abilities for each character.
Each character has a CharacterScript and a SpecialAbilityScript. Since all the characters, friends or foes, have the same basic properties and methods, the only thing that the do different uppon called is their "Special Ability", which could go from healing a teammate, giving an oponent some long lasting damage for several turns, paralyzing an oponent, increasing a teammates or self attack power, etc...
The way I figured how to make this work, is by dividing and grouping the Special Abilities into groups using enumerations:
 public AbilityType abilityType;
 public AbilitySubType abilitySubType;
 public TargetType targetType;

         public enum AbilityType { Support, Offense }
         public enum AbilitySubType{ Bless, Help, Curse, Damage }
         public enum TargetType { Self, Teammate, Team, Enemy, Enemies, All }
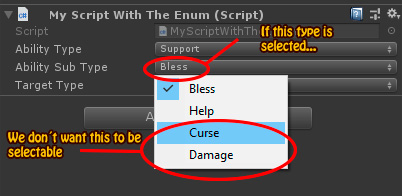
However, I want to restrict the AbilitySubType types shown at the Inspector, based on which AbilityType type is chosen before.
So if, for example, The abilityType type selected at the inspector is Support, then The abilitySubType only shows types Bless and Help.
Is there a way to achieve this at the Inspector using enums? should I use something else instead? or is my approach poorly addressed?
SOLVED: So I found a way to achieve this very quick and easy using custom Inspectors, and consider my problem solved.
TL;DR: I used custom inspector to create toolbar that shows/hide another toolbar and change the types by just pressing them.
Solution:
I created a toolbar with two options: (Support | Offense), if you click Support, a function called TypeSupportSelected() is called and within it I set the AbilityType type to Support, and creates a second toolbar (Bless | Help). Selecting Bless sets the AbilitySubType type to Bless, selecting Help sets it respectively to type Help. This way I don´t have to worry about mixing the incorrect settings (e.g. setting AbilityType to Support and AbilitySubType to Curse)
However, for anyone who has little or null knowledge of using Custom Inspectors and just wants a quick solution for a similar problem, Here is an example:
This is the script that has the enumerations I want to restrict accordingly:
 using UnityEngine;

 public class MyScriptWithTheEnum : MonoBehaviour
 {

     public AbilityType abilityType;
     public AbilitySubType abilitySubType;
     public TargetType targetType;

     public enum AbilityType { Support, Offense }
     public enum AbilitySubType { Bless, Help, Curse, Damage }
     public enum TargetType { Self, Teammate, Team, Enemy, Enemies, All }
 }
So, for example, if you set the Ability Type to Support, You dont want to be able to set the Ability Sub Type to either Curse nor Damage.
And The way I solved it, was by creating a Custom Inspector script. For those unfamiliar with that term: It´s a script that helps you customize the way another script displays its properties at the inspector window (e.g. so you can have colorized buttons and customized labels at the inspector tab, etc...) This Custom Inspector Script you have to put it in a Folder named Editor within the Assets Folder.
The Custom Inspector Script I called MyScriptWithTheEnumEditor. It has to have the namespace "Using UnityEditor" and change the inheritance from MonoBehaviour to Editor
 using UnityEngine;
 using UnityEditor;

 [CustomEditor(typeof(MyScriptWithTheEnum))]//inside Typeof you put the name of the script you want to modify with this custom inspector
 public class MyScriptWithTheEnumEditor : Editor
 {
     //These are the toolbar buttons you are going to see at the inspector
     private string[] _toolbarAbilityType = new string[2] { "Support", "Offense" };
     private string[] _toolbarAbilitySubTypeSupport = new string[2] { "Bless", "Help" };
     private string[] _toolbarAbilitySubTypeDamage = new string[2] { "Curse", "Damage" };

     //these are to hold the current selection from the toolbars mentioned above
     private int _currentToolbarType;
     private int _currentToolbarSubType;

     //this works as a direct reference to the variables at your script with the Enums
     private MyScriptWithTheEnum _myScriptWithEnum;


     private void OnEnable()
     {
         _myScriptWithEnum = base.target as MyScriptWithTheEnum;
     }


     //This will "re-write" the way your script looks at the inspector tab
     public override void OnInspectorGUI()
     {
         ShowMyCustomMagicSpellAssigner();//this is were the magic happens, it shows the customized version of the enums
         EditorGUILayout.HelpBox("default base values showed above this message", MessageType.Info);
         base.OnInspectorGUI();//this is the default way your script is showed at the inspector, leave it so you can see the changes happening in real-time
     }


     public void ShowMyCustomMagicSpellAssigner()
     {
         EditorGUILayout.LabelField("    Magic Spell Properties", EditorStyles.boldLabel);
         GUILayout.Space(5);
         GUILayout.Label("Type: ");
         _currentToolbarType = GUILayout.Toolbar(_currentToolbarType, _toolbarAbilityType);//this will display a toolbar with two options: (SUPPORT | OFFENSE)
         if (_currentToolbarType == 0) { TypeSupportSelected(); }
         if (_currentToolbarType == 1) { TypeAttackSelected(); }
     }

     void TypeSupportSelected()//If you click the SUPPORT option, this new toolbar will be created right beneath the (SUPPORT | OFFENSE) toolbar
     {
         GUILayout.Label("Sub Type: ");
         _currentToolbarSubType = GUILayout.Toolbar(_currentToolbarSubType, _toolbarAbilitySubTypeSupport);//this will display a toolbar with two options: (BLESS | HELP)
         _myScriptWithEnum.abilityType = MyScriptWithTheEnum.AbilityType.Support;//IMPORTANT: This sets the Ability Type to Support at the original script
         if (_currentToolbarSubType == 0) { SubTypeBlessSelected(); }
         if (_currentToolbarSubType == 1) { SubTypeHelpSelected(); }
     }

     void TypeAttackSelected()//If you click the OFFENSE option, this new toolbar will be created right beneath the (SUPPORT | OFFENSE) toolbar
     {
         GUILayout.Label("Sub Type: ");
         _currentToolbarSubType = GUILayout.Toolbar(_currentToolbarSubType, _toolbarAbilitySubTypeDamage);//this will display a toolbar with two options: (CURSE | DAMAGE)
         _myScriptWithEnum.abilityType = MyScriptWithTheEnum.AbilityType.Offense;//IMPORTANT: This sets the Ability Type to Offense at the original script
         if (_currentToolbarSubType == 0) { SubTypeCurseSelected(); }
         if (_currentToolbarSubType == 1) { SubTypeDamageSelected(); }
     }

     //IMPORTANT: This all set the Ability Sub Types at the original script
     void SubTypeBlessSelected()
     {
         _myScriptWithEnum.abilitySubType = MyScriptWithTheEnum.AbilitySubType.Bless;
     }

     void SubTypeHelpSelected()
     {
         _myScriptWithEnum.abilitySubType = MyScriptWithTheEnum.AbilitySubType.Help;
     }

     void SubTypeCurseSelected()
     {
         _myScriptWithEnum.abilitySubType = MyScriptWithTheEnum.AbilitySubType.Curse;
     }

     void SubTypeDamageSelected()
     {
         _myScriptWithEnum.abilitySubType = MyScriptWithTheEnum.AbilitySubType.Damage;
     }
 }
And now this is how it works and looks (Ignore the mouse icon not showing up, or pretend my monitor is touchscreen): 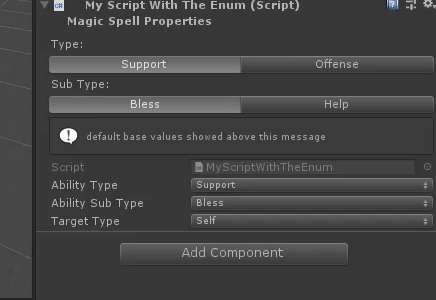
you can test it very easily by just copying these two scripts and setting them up as explained above in a new project. Hope it helps whoever runs across this problem.
