Google Play not compliant with 64 bit despite following the instructions
Hi, I have a few apps on Google Play and I need to update them but since August 1st, all apps must support 64 bit architectures. So I followed the instructions and :
Updated the project to Unity 2018.3 (can't 2019 because an asset doesn't work well in that version at the moment)
Changed Mono to IL2CPP (net 4.0)
Checked all 3 architectures (ARMv1, ARM68, x86)
Checked if SDK, NDK, Gradle and Android Studio were uptodate.
Compiled as an AAB instead of an APK.
All compiles great. I have uploaded the aab to Google Play but I can't publish it because of this error :
This release is not compliant with the Google Play 64-bit requirement The following APKs or App Bundles are available to 64-bit devices, but they only have 32-bit native code: 43. Include 64-bit and 32-bit native code in your app. Use the Android App Bundle publishing format to automatically ensure that each device architecture receives only the native code it needs. This avoids increasing the overall size of your app
I have looked online and there wasn't much (for such a big requirement) and what I found confirmed I have done what was needed. Inside the aab, the lib folder contains all three architectures with the same amount of .so files. Did I miss something? Any help would be appreciated!
Hi, I am in the same situation as you. Until yesterday, I was uploading my Android game everyday with .aab format (32 bits and 64 bits) without any problem.
Yesterday I had the same error message as you. So I tried to checkout the last commit (that was working) to re-upload this version but I also had the error message. The only thing that changed (I$$anonymous$$O) is that I downloaded the "Shader Graph" and "LWRP" packages then I uninstalled them.
But if you had the same problem, at the same time as me, it may be a new test that is performed on Google side (or a bug) which considers our .aab as 32 bits only.
I just checked my other apps (were already supposed to be compliant) and they appear to have the same issue. I hope this will be solved soon, I have announced the beta for this week :'(
EDIT: I finally found the solution!
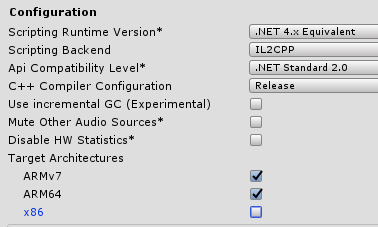
In Player Settings > Other Settings you must now uncheck the x86 box (It is for the 32-bit Intel architecture).
You will now only have the following warning:
The device types on which your application can be installed will be more restricted.
But it drops from 12392 devices to 12385 devices.
It hasn't solved it for me. I also tried to login from another computer but no luck. Will try again in a few hours.
I was able to post the application by disabling x86! I lost only 2 compatible devices so this should be ok. Thanks a lot!
What about 32 bit devices? They cant run 64 bit apps, i guess
Almost all x86 Android devices have a fallback to AR$$anonymous$$v7 so they can still run the app.
Here is the opinion of a Unity member.
For those that don't even have the x86 toggle, just toggle ARMv64, and if you can't toggle it, go to file > build settings
bottom left corner of Build settings > player settings
in the inspector > other settings > scroll down to Configuration > SCRIPTING BACKEND > SWITCH FROM MONO TO IL2CPP > scroll down more > you can now click ARM64
I found this answer here: https://answers.unity.com/questions/1627961/why-is-arm64-greyed-out-how-do-i-turn-it-back-on-t.html
Okay, Guys here is the solution to the problem. Open Unity Hub. Click on "Installs" and you'll see all the install versions of unity on your system. On Top Right of the, each Unity Version installed there are three vertical dots, click on them and choose "Add Modules". The Very First Option is "Android Build Support", expand it and choose "Unity SDK & NDK Tools". What it will do now, it will install the SDK and NDK which support the particular version of unity you are using. After completion of Downloading and installation. Open Unity Editor. Choose Unity > Preference> External Tools and browse for the SDK and NDK you just downloaded and installed. The location is as below, Navigate to the location where Unity is installed and choose Unity > Hub >Editor> Unity(Version, you installed NDK and SDK for) >Playback Engine > ANdroid Player > NDK/SDK.
You are all set now.
Now what you have to do this to go into Player Setting> other settings > Target Architecture > Choose ARMv7 and ARMv64(this is necessary).
Build the APK and you are all set. Accept the answer if it solves your issue. Cheers.
I had to change Scripting Backend (under Configuration) to IL2CPP to be able to chech AR$$anonymous$$64 but thanks for your awnser!
Nothing work for me even unchecked x86. so i posted a question please look at it.
https://answers.unity.com/questions/1774749/unity-google-64-bit-compliance-issue-after-x86-unc.html
