Preserving fine line art (variable zoom and resolutions)?
The game I'm working on uses an illustration art style with lots of thin, detailed lineart created in vector graphics tools. It looks fantastic on very high resolution displays, but at low resolutions, when the camera zooms out, the lines start flickering or disappearing when objects move around, which makes the game look ugly. How can I prevent this from happening?
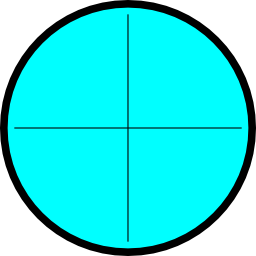
I've created a simple test scene with a circle containing very thin perpendicular lines to demonstrate the issue. This is the 256x256px texture I'm using as a test:
Texture import settings:
Texture Type: Sprite (2D\uGUI)
Sprite Mode: Single
Pixels To Units: 100
Filter Mode: Bilinear
Max Size: 1024
Format: Truecolor
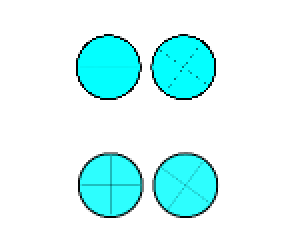
Here is a portion of a 1024x768px screen with two circles next to each other. The orthographic camera has a size of 30. This is what I would expect from point filtering on textures, but it is set to Bilinear. Is this a bug in Unity, or is there something happening that I don't understand?
After trying various strategies for eliminating the flickering and making the lines crisper, I found a script on the oculus forums (https://developer.oculusvr.com/forums/viewtopic.php?f=37&t=1738☆t=20) that implements supersampling by rendering the scene to a render texture twice the size of the screen and displaying that in a new camera that culls everything else. The result (above) is much better, but is still quite blurry because of the bilinear filtering on the render texture. Switching it to point filtering produces results identical to the original image. Why does supersampling help in this case (since the circle textures are set to Bilinear filtering already)?
If supersampling is really the best way of tackling this problem, what is the best way to downsample the large render texture using a different algorithm (not bilinear filtering)?
The camera that renders the large render texture has the script
 using UnityEngine;
 using System.Collections;

 public class TextureRenderCamera : MonoBehaviour
 {
     public RenderTexture CameraRenderTexture;

     void  OnRenderImage (RenderTexture source, RenderTexture destination)
     {
         // Just draw the texture
         Graphics.Blit (CameraRenderTexture, destination);
     }
 }
Can I change Graphics.Blit (CameraRenderTexture, destination); to Graphics.Blit (CameraRenderTexture, destination,mat); where mat would have a custom fragment shader (possibly based on http://stackoverflow.com/questions/13501081/efficient-bicubic-filtering-code-in-glsl) applied to it? I've never dealt with shaders before, so I don't understand the pipeline yet.
That's just the way graphics work. a 256x256 image will always look blurry when blown up, and high-contrast areas will always be choppy when shrunk. The standard solution is to limit the zoom. Another is to use multiple "LOD" images.
Say those two lines are 5 pixels wide (including the "fade into blue" pixels. When it gets shrunk, they become less than a pixel wide, and parts of the line drop out. Rotating and moving recalculates the math, and single pixels drop in and out.
One way or another, vector graphics, super-sampling ... all any solution can do is thicken that line as the image gets smaller (thicken in the full-sized image, or not shrink as much as it should in actual size. Depends how you want to think of it.) I feel like super-sampling isn't the solution at all, and just happens to always make the lines wider.
I've never done this, but in theory you can hand-make the mip-maps and install them yourself. Not sure Unity allows that. So you can draw one that looks good at 32x32, 64x64 ... full screen (that would be the original.) And the graphics card will automatically pick the nearest size and perform blending.
A hack version of that would be to simply switch out images based on zoom. But that would snap (which might not look so bad.)
$$anonymous$$ost of that's true, and I considered doing custom 2D LOD, possibly blending between atlases at runtime, and that sounds like a lot of extra work plus a ballooning of executable size. Supersampling is an improvement because it doesn't require more assets and looks better than nearest neighbor downsampling. All of the 2D art approaches I've seen (excluding pixel art) work from very large images that get downsampled by the engine. High contrast areas in images don't have to be choppy when shrunk down - what pixels are preserved and how depends on the scaling algorithm. http://www.compuphase.com/graphic/scale.htm shows an example of scaling down using bilinear interpolation - no choppiness in sight. The same is true for the game Rayman Legends, where the artists work from 4$$anonymous$$ atlases or greater, but Rayman appears a few cm tall in game and still looks great (including the eyes, which are very high contrast with fine black pupils).
Rayman at the largest and smallest game resolution. Zoom in to see little Rayman's eyes. 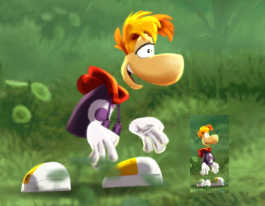
Why does Unity resort to nearest-neighbor downscaling for images marked as bilinear? Is there a way to change this behavior?
AFAI$$anonymous$$, Unity just uses the standard graphic card features. Bilinear filtering, for any size, unless you specify Point (which I think is also known as Nearest Neighbor.) Those top two circles do seem to have snapped to Point filtering, which has never happened for me.
That paper seems like from the days when it was still practical to do graphics on the CPU.
I misspoke about high-contast. Thin high-constrast features give me the only trouble. Sharp lines are the absolute worst. Filtering on shrunk images just fades them out. I think an actual game artist might know more about known problem textures.
I'd suspect Rayman's pupils may be drawn separately. But, as you note, a large sharp circle will generally shrink down just fine (until it becomes less than a pixel.)
SVG Importer | Vector Graphics Plugin for Unity

Unity 4.6.0 Compatible, fully cross-platform.
Easily drag and drop your SVG files directly in your scene. SVG importer fully mimics Unity native sprites so your team doesn't have to learn anything new. Extremely fast and simple workflow for rapid level design. Resolution independent graphics ready for retina displays and full support of the new Unity UI system.
SVG importer automatically converts SVG files into highly optimised meshes and does fully supports both linear and radial gradients.
Features
UI rendering
Opaque rendering
Transparent rendering
Manual level of detail
Depth compression
Custom pivot point
Drag & Drop
Recolor artwork
Automatic Colliders
Full demo project
SVG Importer fully Supports
Simple shapes
Complex shapes
Holes
Linear Gradients
Radial Gradients
Strokes
