How to make a smart main menu select system?
Hi!
Im looking for a smart main menu select system for my prototype. The ideal select system would look something like Phil Fish created in Fez - that small white line around the transparent button. When pressing down, the white thingy goes down and fills the new buttons corners.
Its shown in this video here: https://www.youtube.com/watch?v=Uv_ivloDMnE
I'll provide more info later. And btw, if you try to give me some codes examples PLEASE WRITE THEM IN C#
Thanks anyway :)
It looks like the effect is just a simple tween of a rectangle's size and position between two different UI elements. $$anonymous$$any of the freely available tweening systems on the asset store would provide the features you'd need to do this fairly easily (for instance, HOTween). Otherwise, you can do it completely on your own with a bit more work.
Thanks for your comment.
I'll take a look at this application, although, I don't have any idea how to use this asset store application to fill my needs.
Thanks for the reply anyway :)
The main menu system shown in the vid you posted was quite cool but I would make make my system like this
https://www.youtube.com/watch?v=QxRAIjXdfFU
This is just a suggestion.
Hi,
that kind of a menu does not fit in the game's design Im currently working on, but thanks for the suggestion anyways :ˆ)
 Hello,
Have a look at:
Read through those carefully.
If you still have questions on how to use any/all of those, please post in a comment below.
UPDATE:
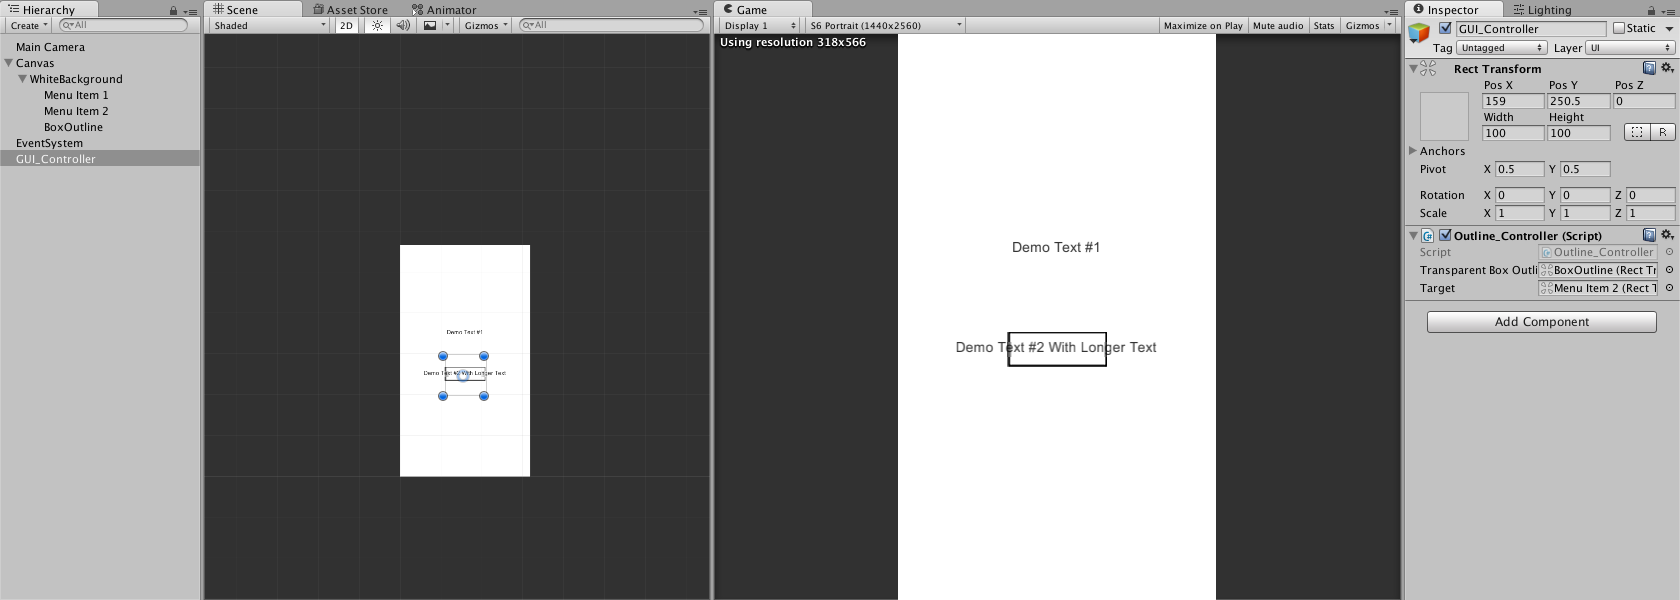
Before reading this, please find yourself a transparent 'frame' texture. You can make one yourself by opening up your favorite editor that supports transparency, creating a box, and then deleting the inside of said box. Be sure to crop the image to the outside of the box. Additionally, when you import the sprite, you should click it and to the right in the inspector, select '(Sprite 2D & UI)' from the dropdown menu. Then, click 'Sprite Editor' and add the number '10' in each field for the 'Border' values. Don't forget to click 'Apply' in the top right corner, or your changes won't take effect! Then, create a new image, place it into your canvas, and set the image type (dropdown on the image component) to 'slice.' This will stretch the image without distorting it.
Here are 5 (powerful) lines of code that will achieve the effect you're looking for.
Please read the script's comments, and also remember that you can use Time.deltaTime * speed (set 'speed as a public float in your variable definitions up at the top of your script!) to increase the rate at which the rectangle moves/scales.
 using UnityEngine;

 public class Outline_Controller : MonoBehaviour
     {
     public RectTransform transparentBoxOutline, target;

     void Update()
         {
         MoveAndScale(); //Self explanatory
         }

     void MoveAndScale()
         {
         transparentBoxOutline.SetParent(target); //Set the box outline parent to its target
         //Lerp can be replaced with 'MoveTowards' for a more consistent effect!
         transparentBoxOutline.sizeDelta = Vector2.Lerp(transparentBoxOutline.sizeDelta, target.sizeDelta, Time.deltaTime);
         transparentBoxOutline.position = Vector2.Lerp(transparentBoxOutline.position, target.position, Time.deltaTime);
         }

     //This method is called via a Button OnClick *OR* an EventTrigger component (try OnMouseClick!)
     //Simply add the component to the menu item, add an 'EventTrigger component, select 'Add Event',
     //Click 'OnMouseClick', and then drag the GUI Manager (or whatever object this script is on) into
     //The Object area of the EventTrigger component. Then from the DropDown, select Outline_Controller
     //And then 'Set Target'. From there, click and drag the menu item into the field that pops up
     //Next to the Outline_Controller script. That's it! Now our text calls the following function when cliked:

     public void SetTarget(RectTransform targetToSet)
         {
         target = targetToSet;
         }

     }
Thanks for your reply.
I'll take a look at those articles, and how those work, but I still have the vibe that I would need a sample of some kind, if you have the time of course.
Appreciate your time for the answer, thank you.
I have updated my answer, as well as added a screenshot of the hierarchy in case it gets confusing. Please let me know if you have any questions. I will be happy to help!
I always have the time to help those who are willing to learn :)
What you are trying to accomplish is quite simple once you know the fundamentals of what I have linked above. I realize that it is difficult to visualize how all of these classes work together to perform such a smooth effect, but I assure you that it is absolutely achievable in very little time with the right code.
Lets make a deal. I will work on some code in order to demonstrate the concept, and you take the time to learn the fundamental concepts behind them?
I'll post again shortly with the code!
