- Home /
How to correctly get jaggy free pixel textures in 3D game?
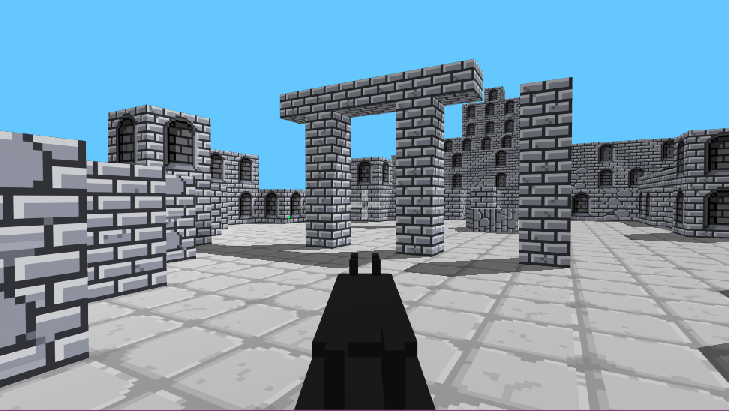
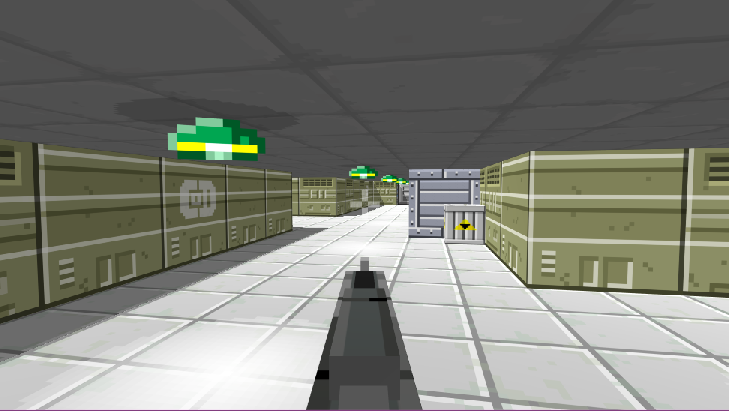
I have a simple 3D fps game (think original Wolfenstein and Doom) where the textures are done old-school pixel style, but I find I'm having to save every texture out from Photoshop at a min of say 512x512 (even though the actual texture art for the walls is actually only 32x32) just to stop it looking all aliased when the game is running.
Here's a couple images of the game:


If I set the textures to Point (no filter) in Unity then they look all jaggy. If I set them to Bilinear or Trilinear in Unity then they look clean, but only if I output them at the much higher resolution from Photoshop first, otherwise Unity's filters turn them into blurred mess.
So how am I supposed to use pixel art textures as intended, which is naturally drawn at a low resolution (so they're not taking up a lot of space each) but without any blurring?
Wolfenstein and Doom has jaggies, so if you are trying to be authentic to that era of games, why is this a problem?
The issue is that there is no way for the render engine to know "this is a line" of "this is a rectangle of pixels" and then anti-alias the jaggy-ness away between scaled up pixels. Know what I mean?
You would have to either resort to "voxels" or planes where each pixel is actually a mesh, then turn on anti-aliasing so that the renderer smooths out the mesh edges, getting rid of the jaggies.
OR find a vector texture solution which maps 2D vector textures (like SVG format) to 3D geometry.
Actually, I may have another solution for you: Do you want your pixel size to remain consistent to how games originally were? If so you could set your resolution to be low and use something like "pixel perfect camera": https://www.youtube.com/watch?v=CU4YjSZNTnY
I think you can only use the pixel perfect camera on 2D games.
And the main reason I don't want the jaggies in my game, even though it's based on retro classics like Wolfenstein and Doom, is because unlike on a normal flat screen, in VR this kind jaggy and shimmering visual artifact tends to increase the likelihood that you'll feel sick while playing.
I want the old pixel look but I want any visual lines, both on the edges of polygons and in the textures, to stay as clean and clear and sharp as possible--but I get what you're saying about this maybe not being possible properly with what I'm going for.
I guess the higher resolution output of the artwork is fine for now.
Answer by Vilhien · Jan 04, 2019 at 09:24 PM
When you change their size in photoshop, under image size make sure "Resample" is unchecked, you shouldn't get any resampling of the pixels upon changing the size that way.
I don't think this is an issue with Photoshop's end of things. The original images output from it are perfectly sharp (using nearest neighbor to preserve the clean pixel look). It's when the game does its stuff in Unity that the issues arise. I either have to go with the original images with no Unity filtering options turned on, in which case they can be used at their original low memory size but are jaggy as hell as soon as the camera isn't looking exactly flat on at them and any angles of the pixels aren't perfectly horizontal or vertical, or I have to use one of Unity's texture filter options that makes them completely blurry unless I first go back and save them out of Photoshop scaled up by an order of magnitude (like I said, a 32x32 now needs to be output at 512x512, or 256x256 at a push, just so Unity's filtering doesn't completely blur things).
So I don't know how to get nice clean pixel textures on my 3D game's walls without having to save every single normally-32x32 texture at 512x512 ins$$anonymous$$d, which seems like a terrible waste of memory, especially with some of my even smaller textures (16x16 or even 8x8) that still need to be saved at $$anonymous$$ 128x128 so they don't look either jaggy or blurry in the game with filters on.
Something seems a bit off to me, like maybe there's some other option I'm missing where I can still use the tiny texture as is but that also keeps them looking nice and smooth in my 3D game too. . . .
Hey bud,
Looked around and playing with it a bit on my end as well with my project.
Yer right, no filter, point seems to make $$anonymous$$e look best as well, but I'm not following any strict guidelines.
I did read somewhere that the pixel count should match, so try setting your pixel count to 32.
I'm running into all sorts of shader issues myself currently as I'm flipping sprites.. It seems every time I venture out to make a 2d game it ends up 3d.
Any other luck so far?
Changing the pixel count doesn't seem to make any difference that I can see. I guess it's not a huge deal because the game's file size isn't huge when I save out the build, but it just seems strange that I have to convert all my pixel art sprites/images to something much bigger before putting them into Unity just to avoid the blur when using either Bilinear or Trilinear Unity filters on the texture settings, which I have to use in order to get rid of the jaggy lines that appears on the textures when viewed any way other than perfectly flat/straight on in my 3D game.
Answer by Eno-Khaon · Jan 07, 2019 at 12:32 AM
Since bilinear interpolation naturally blends between every pixel across the entire length of those pixels, you'll need to write a shader which ignores that normal blending.
For this, you'll want to decide on your basis for calculation:
A) Manually interpolate pixels in a point-filtered texture (which requires no fewer than 4 pixels read), then adapt the blending itself.
B) Manipulate texture reads on an interpolated texture (1 pixel read, but more costly) to make it look like a point-filtered texture, then adapt the position of the read pixel.
This isn't complete, but should get you started in the right direction for approach B. Using an unlit shader as the baseline to keep it short:
 Shader "Unlit/FilterScale"
 {
     Properties
     {
         _MainTex ("Texture", 2D) = "white" {}
         _Threshold ("Rounding Threshold", Range(0.0, 1.0)) = 0.5
     }
     SubShader
     {
         Tags { "RenderType"="Opaque" }

         Pass
         {
             CGPROGRAM
             #pragma vertex vert
             #pragma fragment frag

             #include "UnityCG.cginc"

             struct appdata
             {
                 float4 vertex : POSITION;
                 float2 uv : TEXCOORD0;
             };

             struct v2f
             {
                 float2 uv : TEXCOORD0;
                 float4 vertex : SV_POSITION;
             };

             sampler2D _MainTex;
             float4 _MainTex_ST;
             float4 _MainTex_TexelSize;
             float _Threshold;

             v2f vert (appdata v)
             {
                 v2f o;
                 o.vertex = UnityObjectToClipPos    (v.vertex);
                 o.uv = TRANSFORM_TEX(v.uv, _MainTex);
                 return o;
             }

             fixed4 frag (v2f i) : SV_Target
             {
                 // Half-pixel offset to grab the center of each pixel to disguise bilinear-filtered textures as point-sampled
                 float2 halfPixel = _MainTex_TexelSize.xy * 0.5;
                 // Location (0-1) on a given pixel for the current sample
                 float2 pixelPos = frac(i.uv * _MainTex_TexelSize.zw);
                 // sub-pixel position transformed into (-1 to 1) range from pixel center
                 pixelPos = pixelPos * 2.0 - 1.0;
                 float2 scale;
                 float2 absPixelPos = abs(pixelPos);
                 // If sub-pixel position is near an edge (_Threshold), use point-filtering (scale = 0)
                 // Otherwise, use an analog dead zone calculation to approximate blending
                 // (note: can be improved)
                 // http://www.third-helix.com/2013/04/12/doing-thumbstick-dead-zones-right.html
                 if(absPixelPos.x < _Threshold)
                 {
                     scale.x = 0.0;
                 }
                 else
                 {
                     scale.x = (absPixelPos.x - _Threshold) / (1.0 - _Threshold);
                 }
                 if (absPixelPos.y < _Threshold)
                 {
                     scale.y = 0.0;
                 }
                 else
                 {
                     scale.y = (absPixelPos.y - _Threshold) / (1.0 - _Threshold);
                 }
                 // Calculate the new real UV coordinate by blending between the center of the current pixel and the original sample position per axis
                 float2 uvCoord;
                 uvCoord.x = lerp(floor(i.uv.x * _MainTex_TexelSize.z) * _MainTex_TexelSize.x + halfPixel.x, i.uv.x, scale.x);
                 uvCoord.y = lerp(floor(i.uv.y * _MainTex_TexelSize.w) * _MainTex_TexelSize.y + halfPixel.y, i.uv.y, scale.y);

                 float4 col = tex2D(_MainTex, uvCoord);
                 return col;
             }
             ENDCG
         }
     }
 }
I apologize that it's a little sloppy (I got the algorithm close enough to function well, but can't remember what I'm missing to make it just a little cleaner).
Thanks for your feedback. This, however, is way, way beyond my understanding of code and everything around it at this point in time, even your simple explanation before the code :-o, so I'll think I'll just leave it for now and come back to it if necessary later on, when hopefully I'll understand more complicated code and stuff far better. I literally have no clue whatsoever what any of that code means, and I wouldn't have the slightest idea where to start working with/on it. I was really just hopeful of a simple setting in Unity that I'm missing or some basic way of creating the images slightly differently that might have solved the issue, or something along those lines. Thanks again though, and I'll keep this on hand in case I need to come back to it at some future time.
No problem. Saving texture memory can be tricky business when you want more out of it.
I went back through and added comments to the shader example to help explain what's going on in it.
And, yeah, expanding on it to be fully featured isn't exactly simple, but is certainly worth the time and research eventually.
Answer by BassDJ13 · Sep 28, 2021 at 04:22 PM
I understand your question and why it looks good when filtered biliniear when the texture is saved in a much larger scale in photoshop. I'm looking for the same thing ;) Have you found an easy solution yet?
Some random thoughts on this subject. What you would like to have as a result is comparable with Antialiasing which is used to make geometry borders look more smoothly. But instead of cleaning up geometry borders you would like to perform this on textures between pixels. Technically I could understand why this is more gpu consuming then just using high res textures as a source. Maybe the textures could be upscaled when the game starts somehow. Or maybe render the whole game twice as high resolution as being displayed on screen. This is no way gpu friendly. I think you also get in trouble with mipmaps when using very low resolution textures.
So that are my random thought, I just hope like you there is an easy solution.
Your answer

Follow this Question
Related Questions
Best method for dealing with rough sprite edges due to rotation? 1 Answer
Shader shadow anti-aliasing problem 1 Answer
Help me out with a simple smoothing function for accelerometer data? 1 Answer
How can i smooth my .dae mesh? 1 Answer
How can I get smooth reflections instead of these jagged ones? 1 Answer
