Blendshape import: mesh normals don't import correctly
Ever since Unity supports blendshapes, I have had issues with importing mesh normals. When I create a blendhsape face rig in Blender and export it either as fbx or save it as a .blendEverything imports correctly, except the areas where the blendshapes are: it looks like some faces are inverted. In Blender, everything looks correct.
I've noticed this only happens with blendshaped meshes. On this image you see left: a skinned mesh renderer without blendshapes, right: with blendshapes. 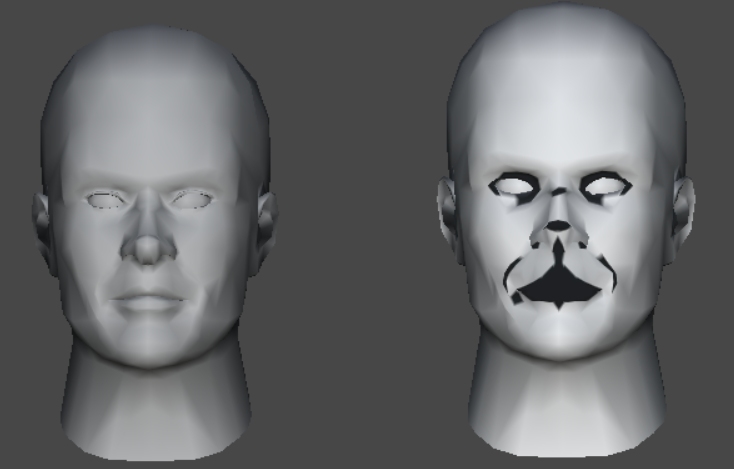
I've tried pretty much everything, even tried saving and fbx exporting in every version of blender from 2.49 up to 2.69, but the result is the same. Has anyone ever had issues like this? Any help would be appreciated!
I'm having a similar problem, except it's happening for me in areas that are not specifically modified by shape keys (aka BlendShapes) in Blender. Even without making any modifications after adding the shape keys (basis + 1 more key), I still get artifacts similar to the ones shown in your image after I import the model to Unity. Whether I do this using a .blender file or an .fbx doesn't matter, same issue.
Removing the shape keys and re-importing the same model removes the artifacts. I've been trying to figure out how to solve this problem for a while now, but no luck, which really bums me out. :/
Checked all for Non-manifold?
Also checked your Vertex Normals as well as your Face Normals?
$$anonymous$$y model see$$anonymous$$gly has all the normals correctly setup, and can't find any Non-manifold problems either, and it displays perfectly fine in Unity as long as there are no shape keys involved.
**EDIT: I lied, the artifacts aren't gone with unlit shaders, just a lot less visible.
I believe I encountered this once when I made a Unicorn with an extendible horn. The horn wouldn't render until I re-UVmapped the model.
The trouble was that all those vertices were mapped to 0,0 of the UV and so were not actually mapped to the any area of the texture at all.
Trying to sum up what I've learned so far: Things that have not fixed the artifact problem for me: - Creating a new project and importing the model there, just in case there was something in the old project that was causing problems - Switching to a different shader on the model - Removing doubles on the model (no doubles to remove) - Flipping/Recalculating normals (no difference) - Redoing the UV $$anonymous$$ap (UV map is completely different, but artifacts appear in same places as before) - Triangulating all faces on the model in Blender (artifacts still appear in same places) - Converting back to quads (same old story, also, moot, since Unity triangulates the model anyway)
Things that have had some effect on the artifacts: - Removing the Shape $$anonymous$$eys from Blender also removes the artifacts completely. Re-adding Shape $$anonymous$$eys, even with those Shape $$anonymous$$eys doing nothing at all, causes artifacts to re-appear. - Adding shape keys for scaling up the areas affected by the artifacts (nose, hands, breasts). As those areas are scaled up using the blendshapes in Unity, the artifacts are reduced. Scaling the meshes up by scaling their bones in Unity does not have the same effect. - Un-subdividing the model removed a lot of the artifacts, but some remain. Bonus: now the model looks horrible.
Other observations: - The artifacts do not cover 100% of the surface of the faces they appear on, but looks like "shading" that covers one half of the faces. (See screenshots) - Found another question on this page that seems related (but also no proper solution): http://answers.unity3d.com/questions/614823/what-is-causing-black-spots-on-the-model-i-am-impo.html


I solved the problem by simply exporting an fbx of my .blend file, letting a friend import it into 3ds max and re-export it as an fbx file. It now works fine!
From what I've learned Blender sometimes creates these mesh 'errors' when you add blendshapes to a mesh. There's nothing you can do about it in Blender or Unity, as far as I can say.
I can confirm that this workaround does actually work (tried with trial version of 3DS max).
Couple of downsides to this work-around, though: 1) You need access to 3ds $$anonymous$$ax 2) 3ds $$anonymous$$ax only supports 100 channels for blendshapes (or "morph targets"), and will crash if you try to import a mesh with more blendshapes than that (I currently have a mesh with 105 shape keys :P)
I'm using Blender 2.78 - and had a similar problem. After exporting the mesh to FBX (7.4 binary option) it was fixed. I didn't have to import it to 3ds Max - just exported it straight from Blender and imported to Unity. Hope it helps.
